Korbyt Booking New Diary View
The New Booking Diary is a redesigned calendar view introduced in V9.9.
Written By Ed Kinne
Overview
The New Booking Diary is a redesigned calendar view introduced in V9.9. It gives you a clear, unified picture of all your resources across multiple floors and locations in a single scrollable screen, with faster booking actions and a personalized experience that remembers your preferences.
Note: The New Booking Diary can be enabled or disabled by your administrator. If you do not see it, contact your system administrator to request access.
Enabling the New Booking Diary
The New Booking Diary is enabled using a feature flag in Global Settings.
Administration > Settings > Global Settings > Default Settings
Locate the New Booking Diary
Set the toggle to ‘Yes’
Click Save.
Users will see the New Booking Diary on their next session.
Note: No additional license is required to enable the New Booking Diary. The feature flag can be toggled on or off at any time without affecting existing booking records.
Extended Diary View with Business Hours Scrolling
The Booking Diary now gives users full 24-hour visibility without forcing a trade-off between time coverage and grid clarity.
When Business Hours is enabled, the diary continues to open at your configured working hours, which users already know. Users can now scroll beyond the business hours window to view the full 24-hour day, without changing a single setting or losing any detail in the grid.
For most people, nothing changes. The diary opens exactly as it always has. The difference is that the full day is now just a scroll away when you need it.
For users who want the entire 24-hour span in a single frame without scrolling, unchecking Business Hours delivers that; the diary compresses the slot size to fit all 24 hours in one view.
Navigating and Using the New Booking Diary
When you open Korbyt Booking, the New Booking Diary is your home screen. It displays all resources and their availability for the selected date, across every location included in your current view.
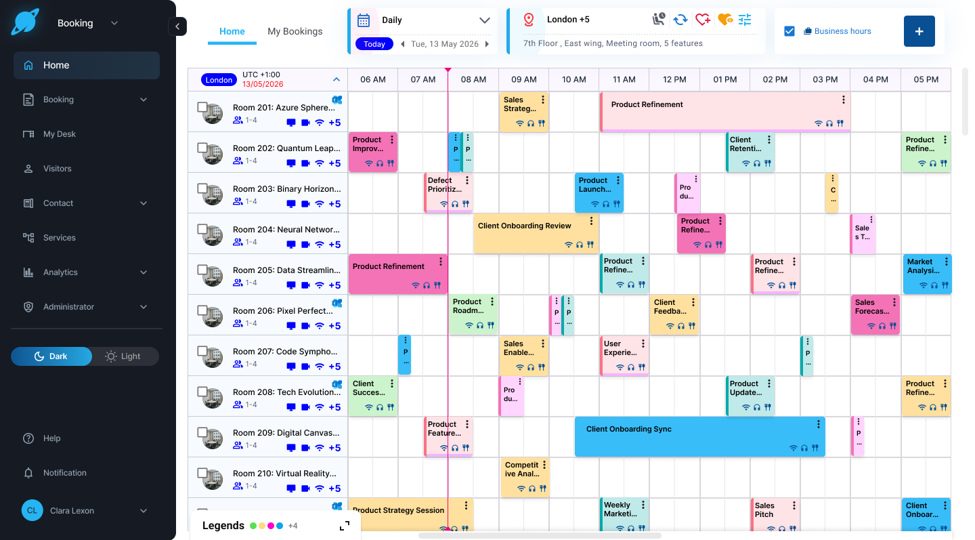
Tip: The date and time header stays locked in place as you scroll through long resource lists. You will never lose sight of the time scale, even when working across large estates with dozens of spaces across different time zones.
Change the Date
You can move to any date in three ways:
To navigate forward or backward one day at a time, click the date navigation arrows at the top of the diary.
To return to today's date, click Today.
To jump to a specific date, click the date picker icon and select the date you require.
Filter Your View and Save Favorites
Use the Filters panel to choose which locations, floors, and resource types appear in your diary. You can save your most-used filter combinations as personal favorites, so your preferred view loads with a single click. If Resource Groups have been enabled for your application, you should be able to filter your view using Resource Groups as well.
To Apply Filters:
Click the Filters button in the top navigation bar to open the filter panel.
Expand a region or property by clicking the arrow next to its name.
Select the checkboxes for the floors and resource types you want to include.
Click Apply Filters to update the diary. The resource list refreshes to show only your selected locations.
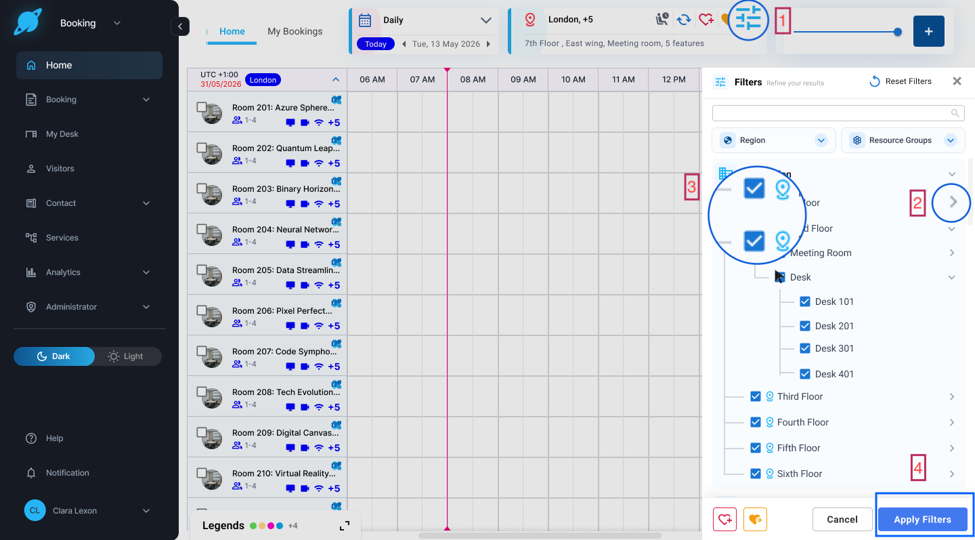
Save a Favorite
Once you have the filter selection you want, save it as a favorite so you can return to it instantly on future sessions. Favorites could be saved before or after applying Filters.
Set your filters as described above.
Click the Save Favorites icon (heart with +) at the bottom of the filter panel.
Your current filter combination is saved to your personal account and will be available to load on future sessions.
If you click on Apply Filters without saving your favorites, you can still save your favorites by clicking on the heart with + icon on the Home View.
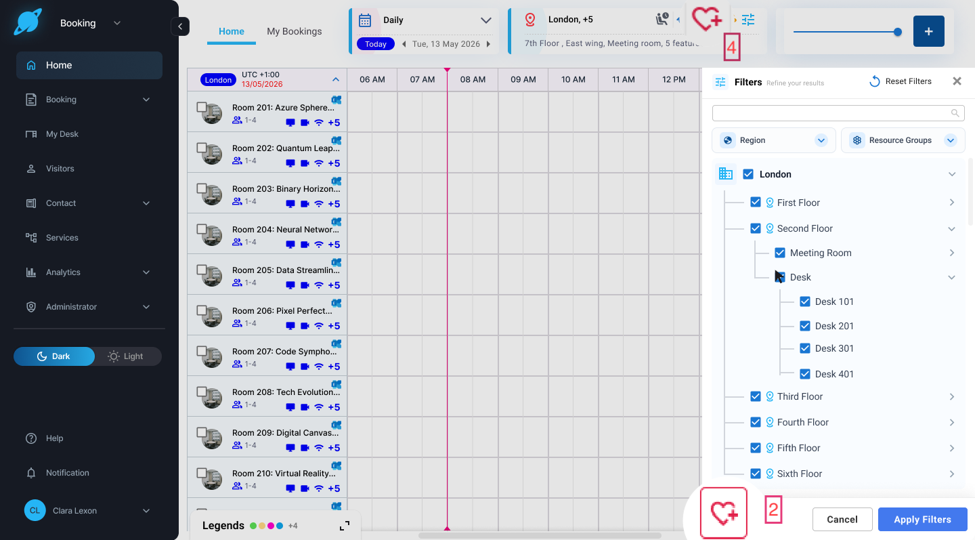
Note: Favorites are personal to your account. Each person in your organization can save their own combinations independently.
Load a Favorite
On the Diary View, click the Load Favorites icon on the top navigation bar.
The diary updates immediately to reflect that view.
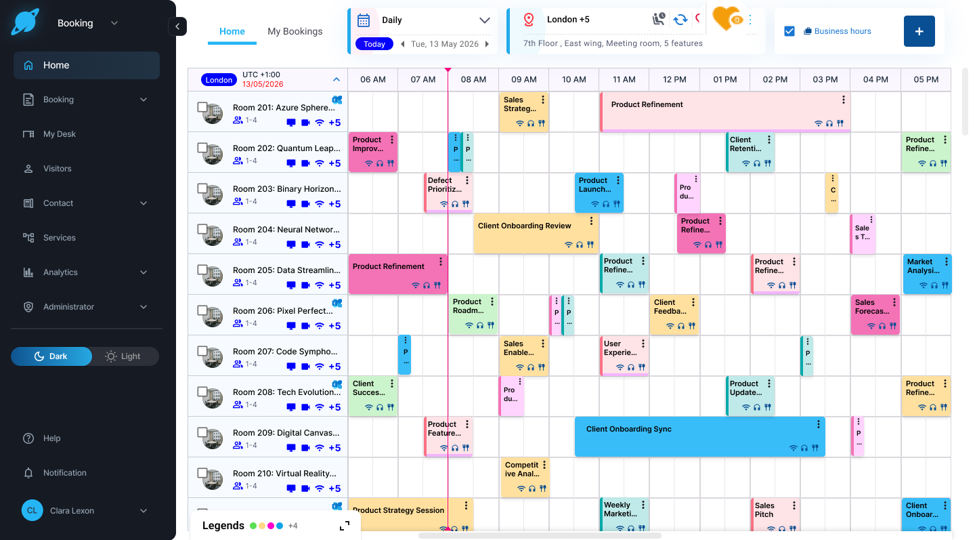
Tip: If you manage a specific floor or location every day, save that view as a favorite. It will be waiting for you each time you open the diary.
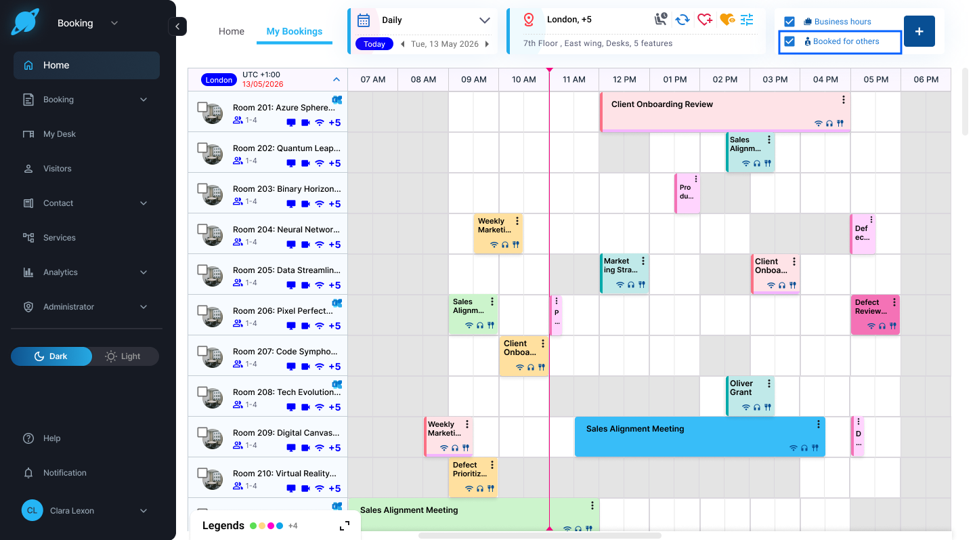
My Bookings
The My Bookings view filters the diary to show only the bookings you have made across all resources and locations. This is the fastest way to review your own schedule without switching away from the diary.
Click My Bookings in the top navigation bar.
The diary updates to display only your bookings across all resources and locations. Other bookings are dimmed for context.
By default, My Bookings will display bookings created by the user for themselves, and for others; however, they can view bookings only created for themselves by unchecking the ‘Booked for Others’ option on the top navigation bar.
Click Home to return to the full diary view.
Quick Book
Quick Book lets you create a booking directly from the diary without opening the full booking screen. Locate a free slot, click it, and the panel opens immediately.
Locate the resource you want to book in the resource list on the left.
Click on an empty time slot in the diary grid at the time you want to start your booking.
The Quick Book panel opens on the screen. Review the pre-populated date and time, then complete the required fields.
Enter a Booking Title and complete any other required fields.
Click Save to confirm. The new booking card appears in the diary immediately.
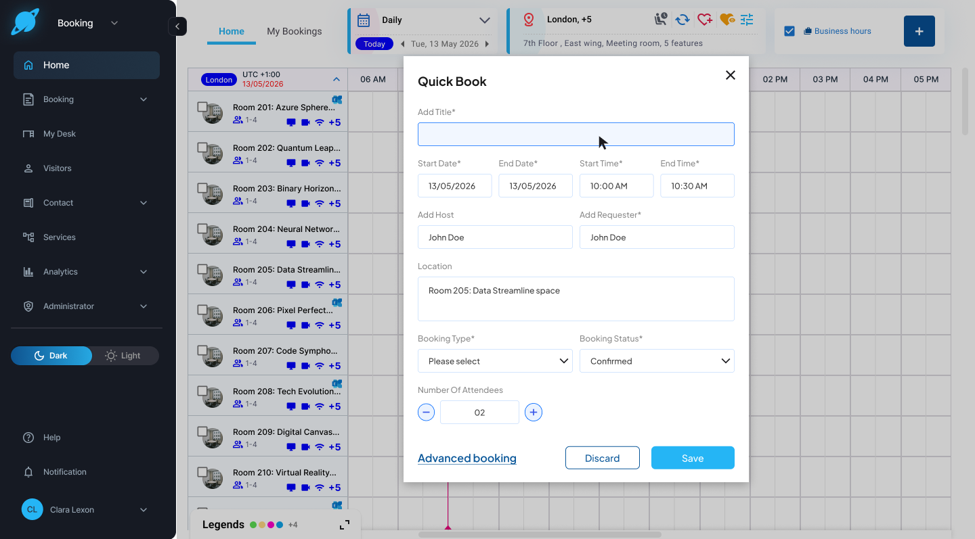
Note: The fields available in Quick Book depend on how your system administrator has configured the booking wizard for the resource type. For bookings that require services, attendees, or questionnaires, click Advanced Booking inside the Quick Book panel to open the full booking screen.
Reading Booking Cards
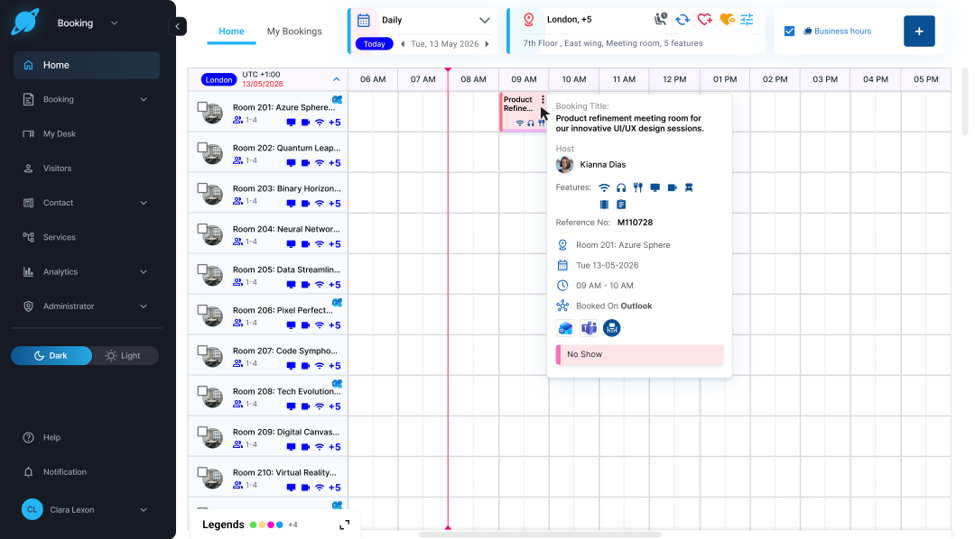
Each booking in the diary is displayed as a card on the grid. Cards show the booking title and a set of visual indicators that tell you briefly what is happening in that space.
View Booking Details
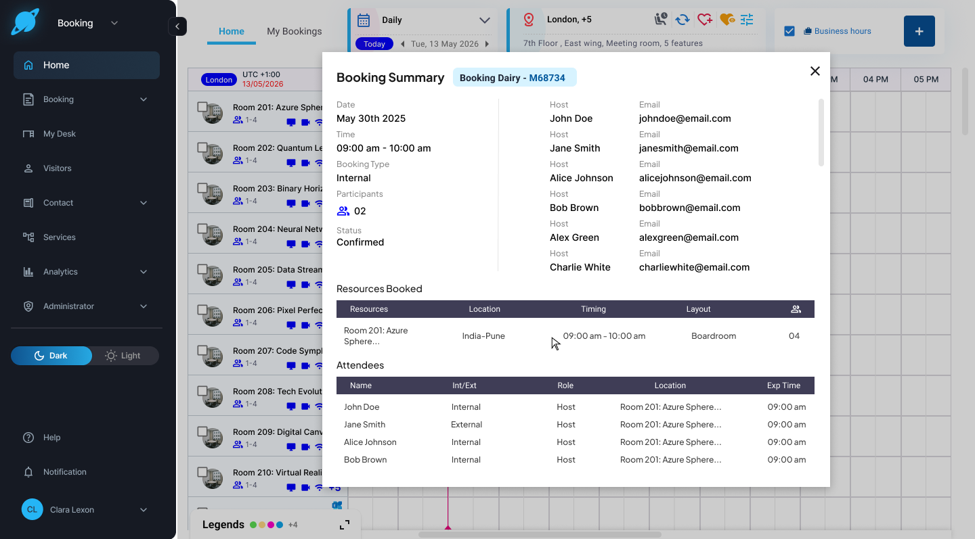
Click any booking card to open the Booking Summary. You can review the full details of a booking without navigating away from the diary view.
Click any booking card in the diary grid or click on Booking Summary within the Ellipses menu.
The Booking Summary panel opens on the diary and displays the following details:
Booking title, organizer, and current status
Resource name, floor, and location
Date, start time, end time, and duration
Invited attendees and any services or add-ons attached to the booking
Collaboration platform link, if an online meeting has been added
To make changes, click Edit to open the full booking form.
Click outside the panel or press Escape on your keyboard to close the summary and return to the diary.
Copy, Move, Recur, and Cancel from the Diary
You can take quick action on any booking directly from the diary using the booking card menu, without opening the full booking screen.
Open the Booking Card Menu
Locate the booking on the diary grid.
Click the Ellipses Menu icon.
Select the action you want from the menu that appears.
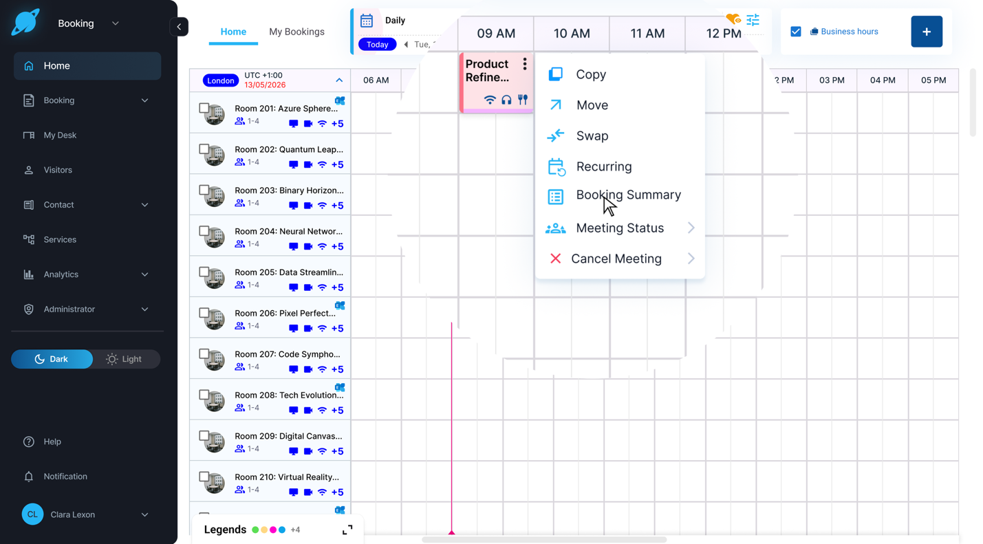
Copy a Booking
Select Copy from the menu.
In the Copy Booking panel that appears, review and update the following details:
Update the Booking Title if required.
Select the new date and time for the copied booking.
Click Copy to create the new booking. It appears immediately on the diary.
Move a Booking
Select Move from the menu.
In the Move Booking panel that appears:
Select the resource or resources to retain in the booking.
Select the new date and time.
Click Confirm to apply the change. All attendees will be notified of the updated time.
Create a Recurring Booking
Select Recur from the menu.
In the Recur Booking panel that appears:
Select the recurrence pattern - Daily, Weekly, Monthly or Yearly.
Set the end date or the total number of occurrences for the series.
Click Save to create the recurring series. Each occurrence appears as a separate booking in the diary.
Cancel a Booking
Select Cancel Booking from the menu.
Review the prompt and click Confirm to proceed with the cancellation.
The booking is removed from the diary immediately.
Interpreting the Legend
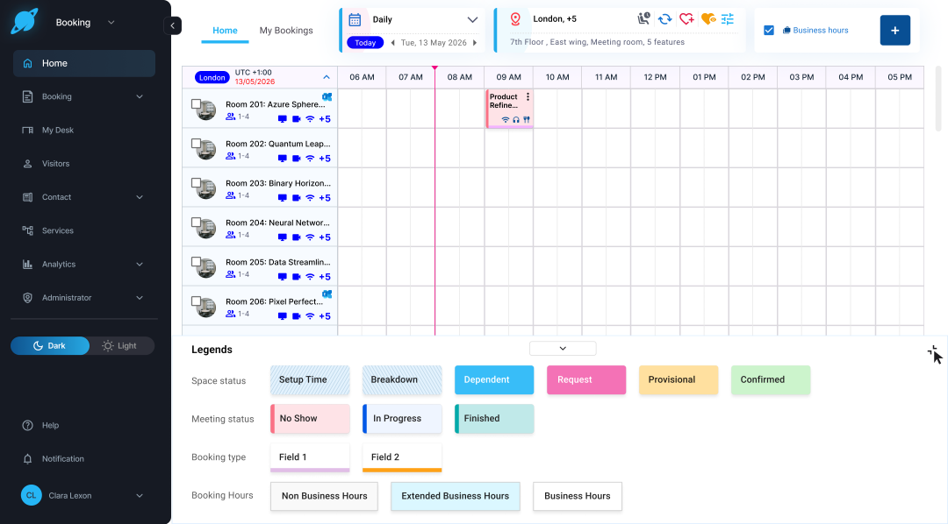
The Legend panel explains what the colors and indicators on the diary represent. Expand it for full context or collapse it to give yourself more screen space.
Click Legend in the bottom-left corner of the diary.
The panel expands to display the full color key for booking statuses, meeting types, and time indicators.
Click on the top arrow to expand and collapse the view of the legend.
Click on the minimize icon to collapse the panel to a thumbnail and restore your diary screen space.
Personalize Your Diary View