Bookit FAQs
Anwers to specific use questions in the Bookit Web Interface
Written By Ed Kinne
You can select a question from the navigation bar on the right.
How can I add Services?
Services are optional items that can be added when creating a booking. Services are also space-specific, so some services may not be available at all locations/spaces.
Use the Search Panel to identify criteria for your booking
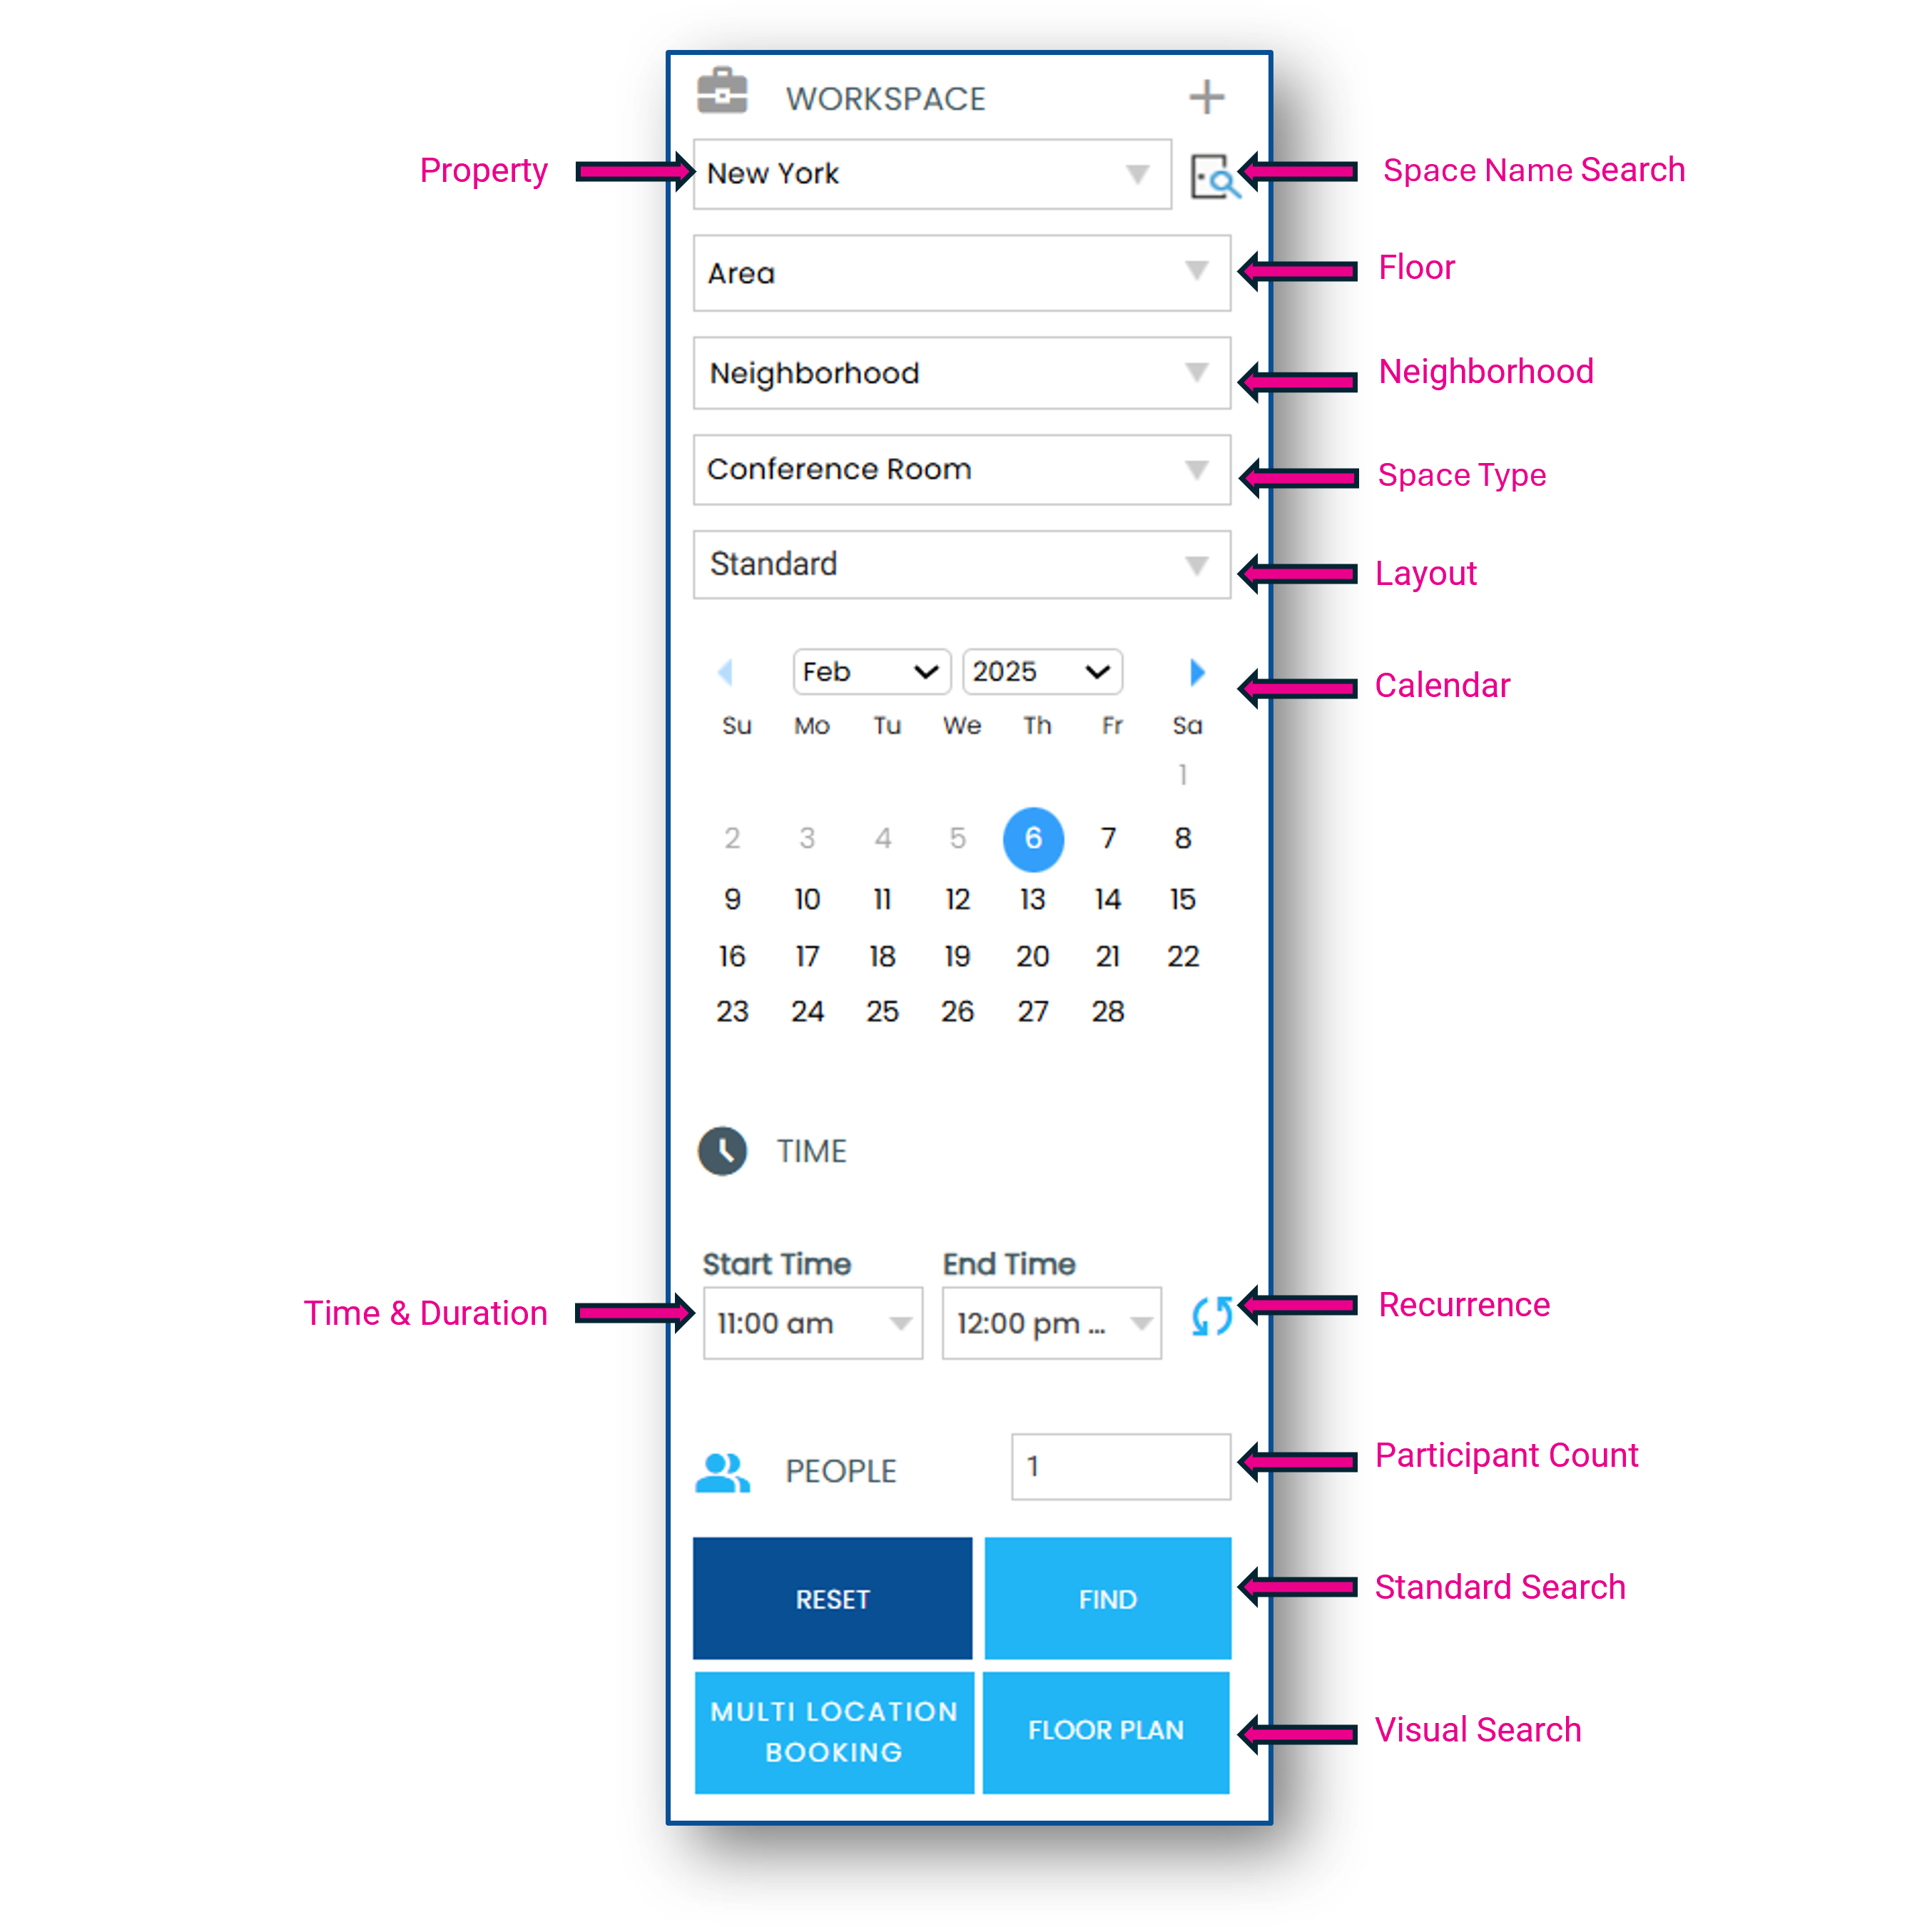
Select a space and click Add Services

Services are displayed alpha-numerically by category, subcategory, and item
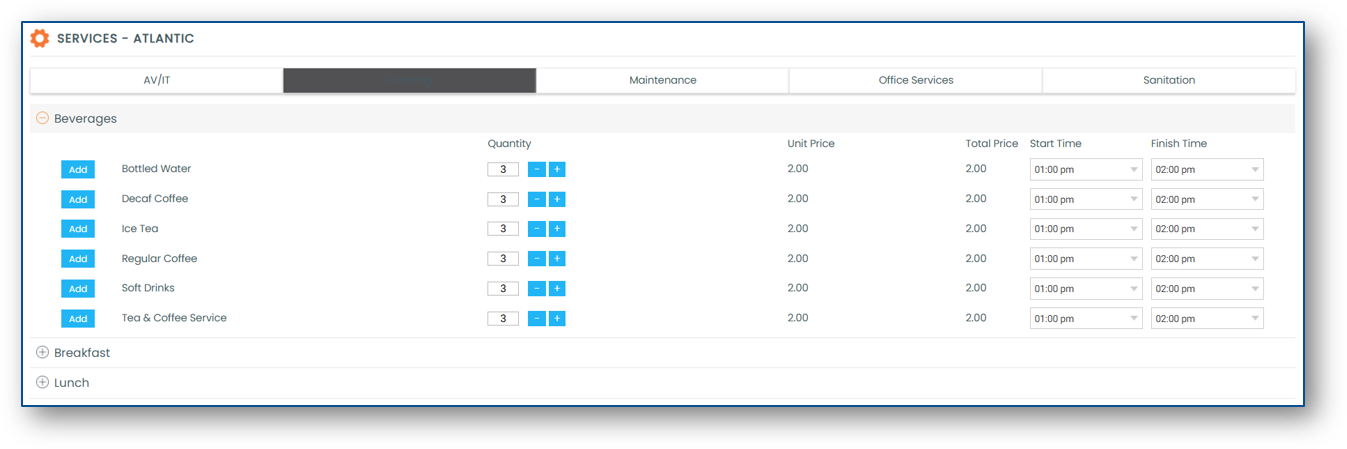
Select the quantity of the service item(s) you want added to your booking and click the Add button
The Start Time and the Finish Time of the service can be modified
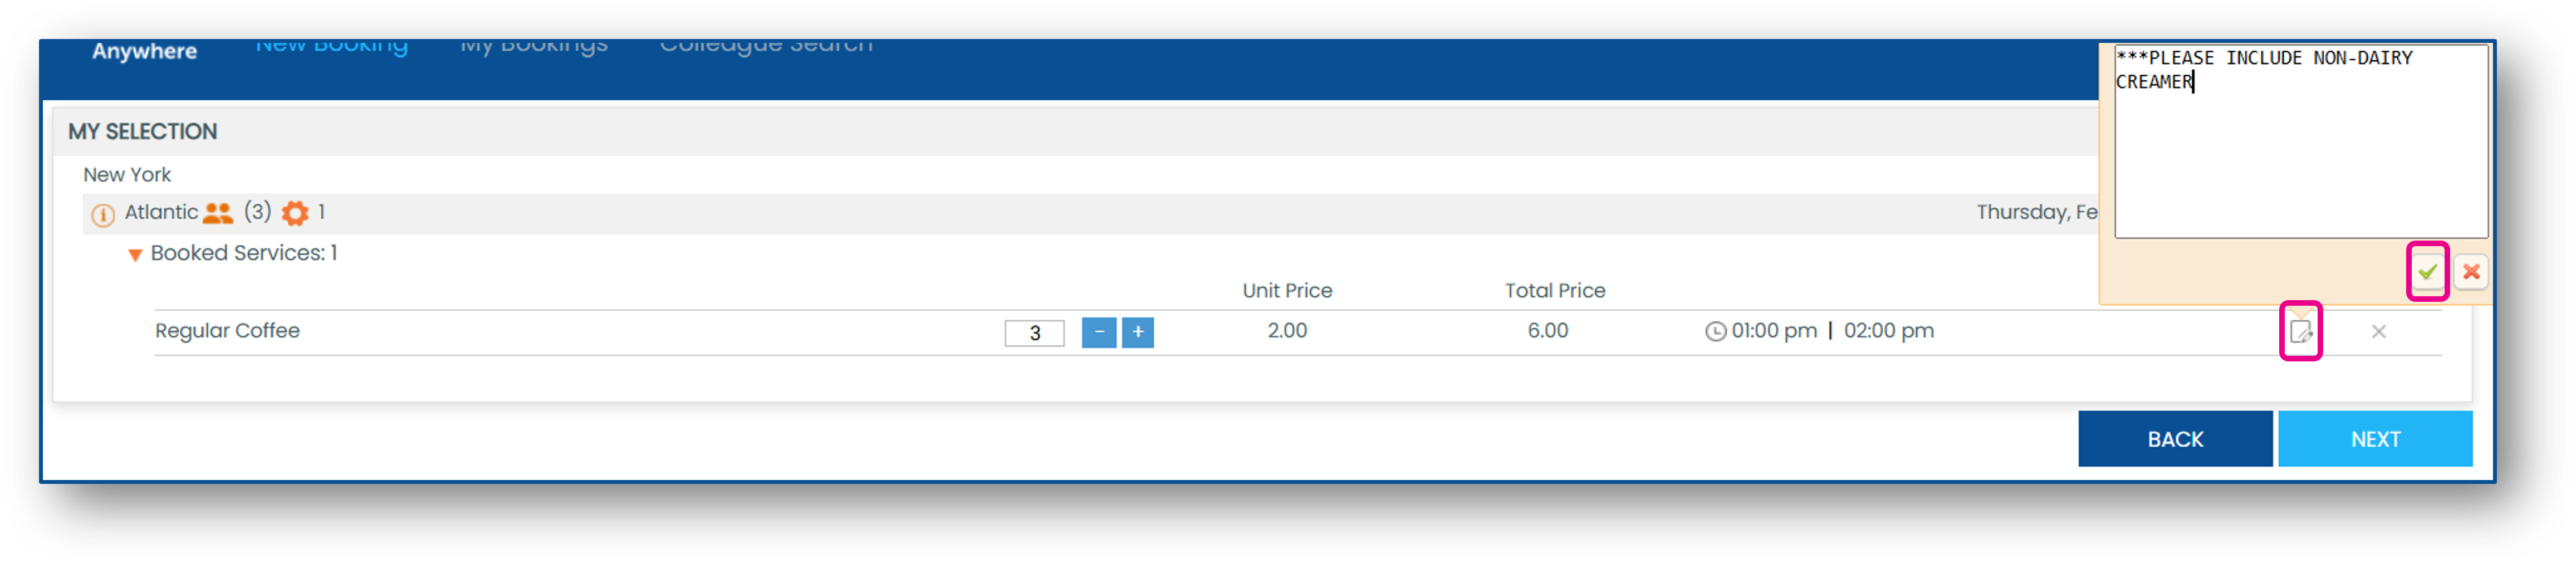
You can add a note to your service item(s) by clicking the notebook icon once they are added to your booking
If you have multiple spaces attached to a booking, be sure to click the room name at the top to toggle between spaces and add the desired services
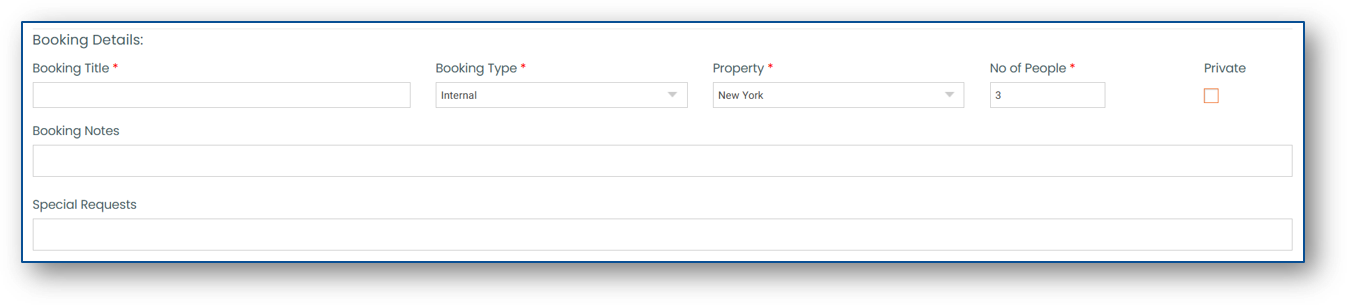
Once you have added the desired services to your booking, click Next and complete your booking by completing the Booking Details
How can I add Attendees?
You can invite both internal and external attendees to your booking.
The Add People option displays in the People section at the bottom of the list of rooms
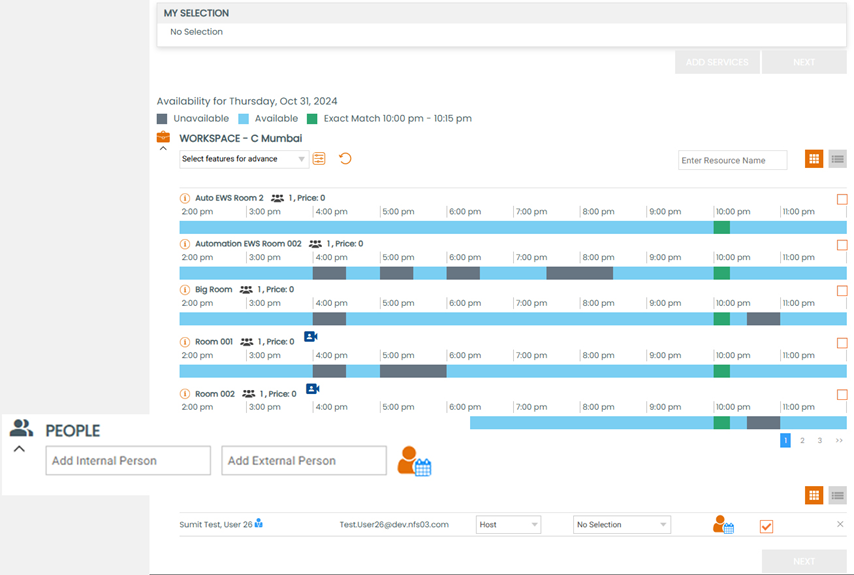
Internal Attendee
The Add Internal Person field pulls information from your Korbyt Booking system and is a database of all employees that have been synchronized with your system. Only employees who have been added to Korbyt Booking will appear in this field.
To add an Internal Attendee, enter their name(s) in the Add Internal Person field. Once you have typed the first three letters of their first or last name, a list of names will appear. Select the name from the list to add to your booking.
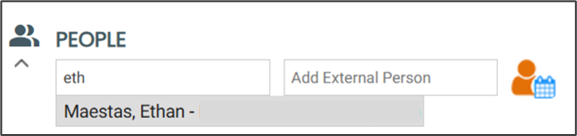
Click on the Free/Busy icon to view the availability of the internal attendee
External Attendee
The Add External Person field displays a free text field to add the attendee’s name. The First Name and Last Name are mandatory fields whilst the email field is optional.
To add an External Attendee, click in the Add External Person field, complete the mandatory fields, then click on the plus button

When an external person is added, they are listed below the Host and other Internal Attendees

Remove an Attendee
An attendee can be removed before OR after a booking is created, depending on the user’s rights in the system.
To remove an attendee, click the X next to their name

Assign Booking Roles
The logged-in user is the default Host and Organizer for all bookings. You can assign another individual as a Host or Organizer; the person the meeting invitation is sent from.

To assign a different Host, use the Booking Role dropdown to select Host, and the blue host icon will appear next to their name
To change the Organizer, click the orange checkbox
Multiple Hosts may be assigned if this setting is enabled within your Korbyt Booking system
How can I book from the Floor Plan?
You can search for and book a space directly from a floor plan.
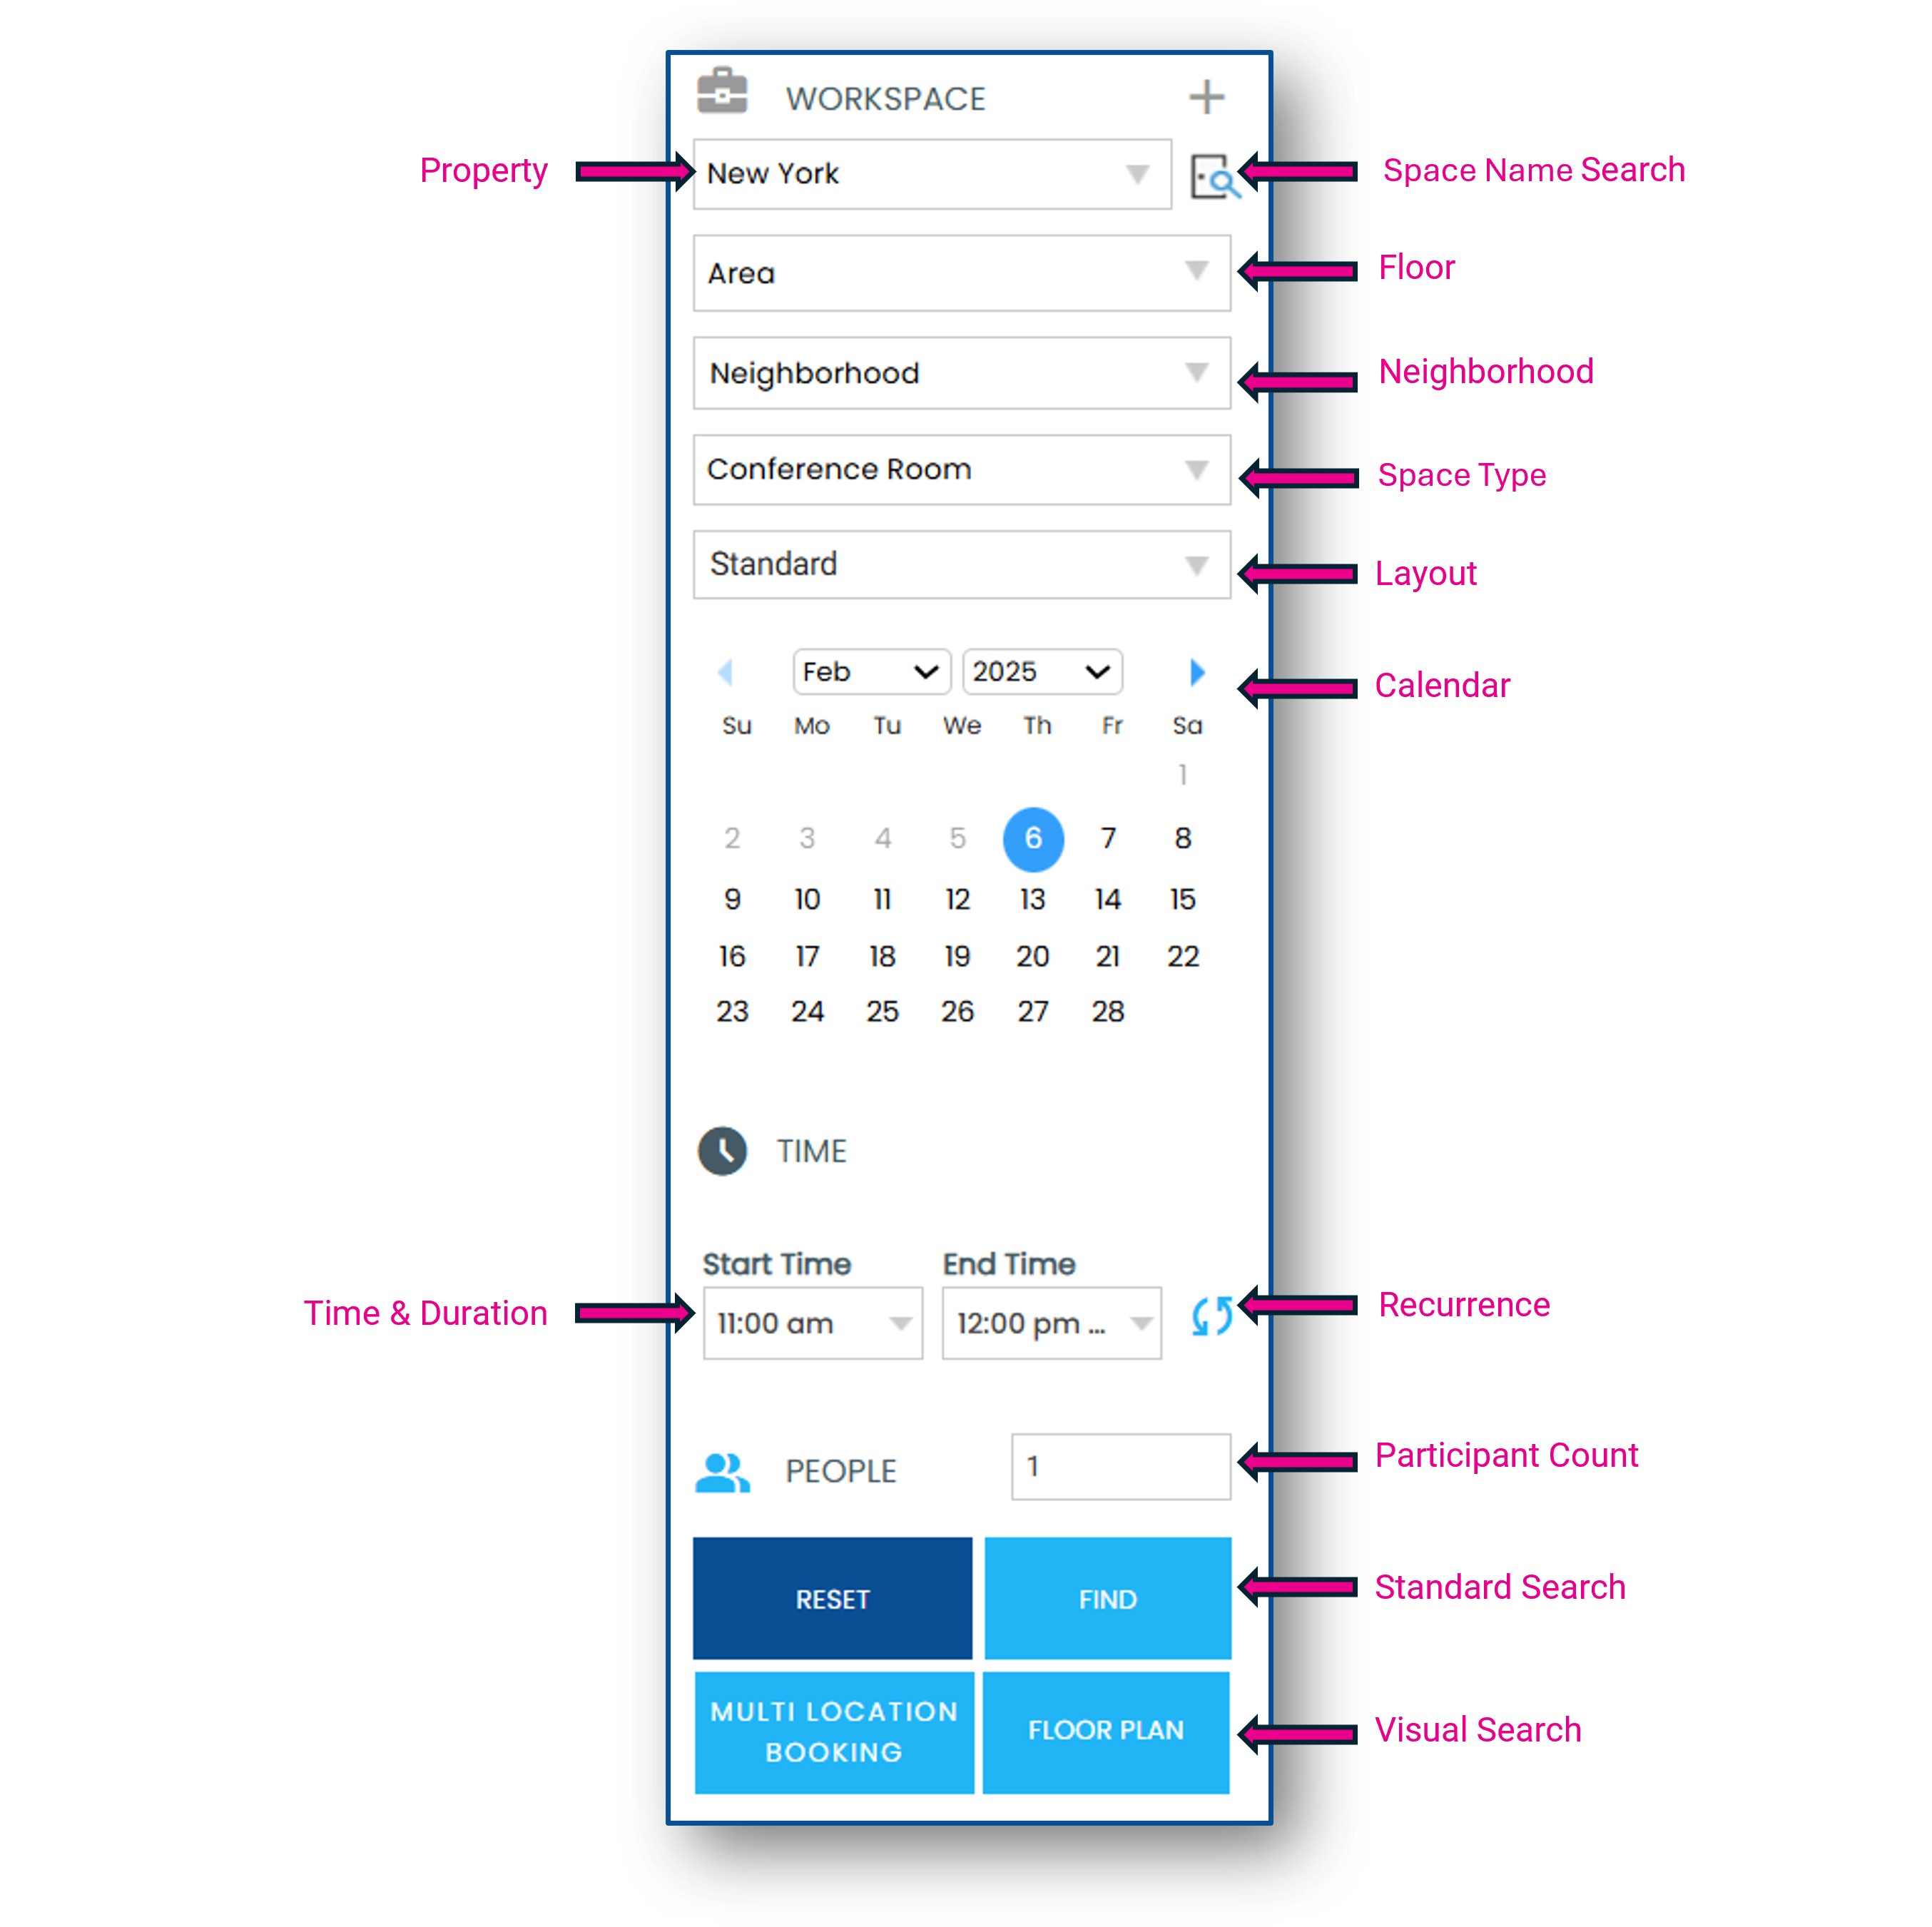
Use the Search Panel to identify the criteria for the space you require
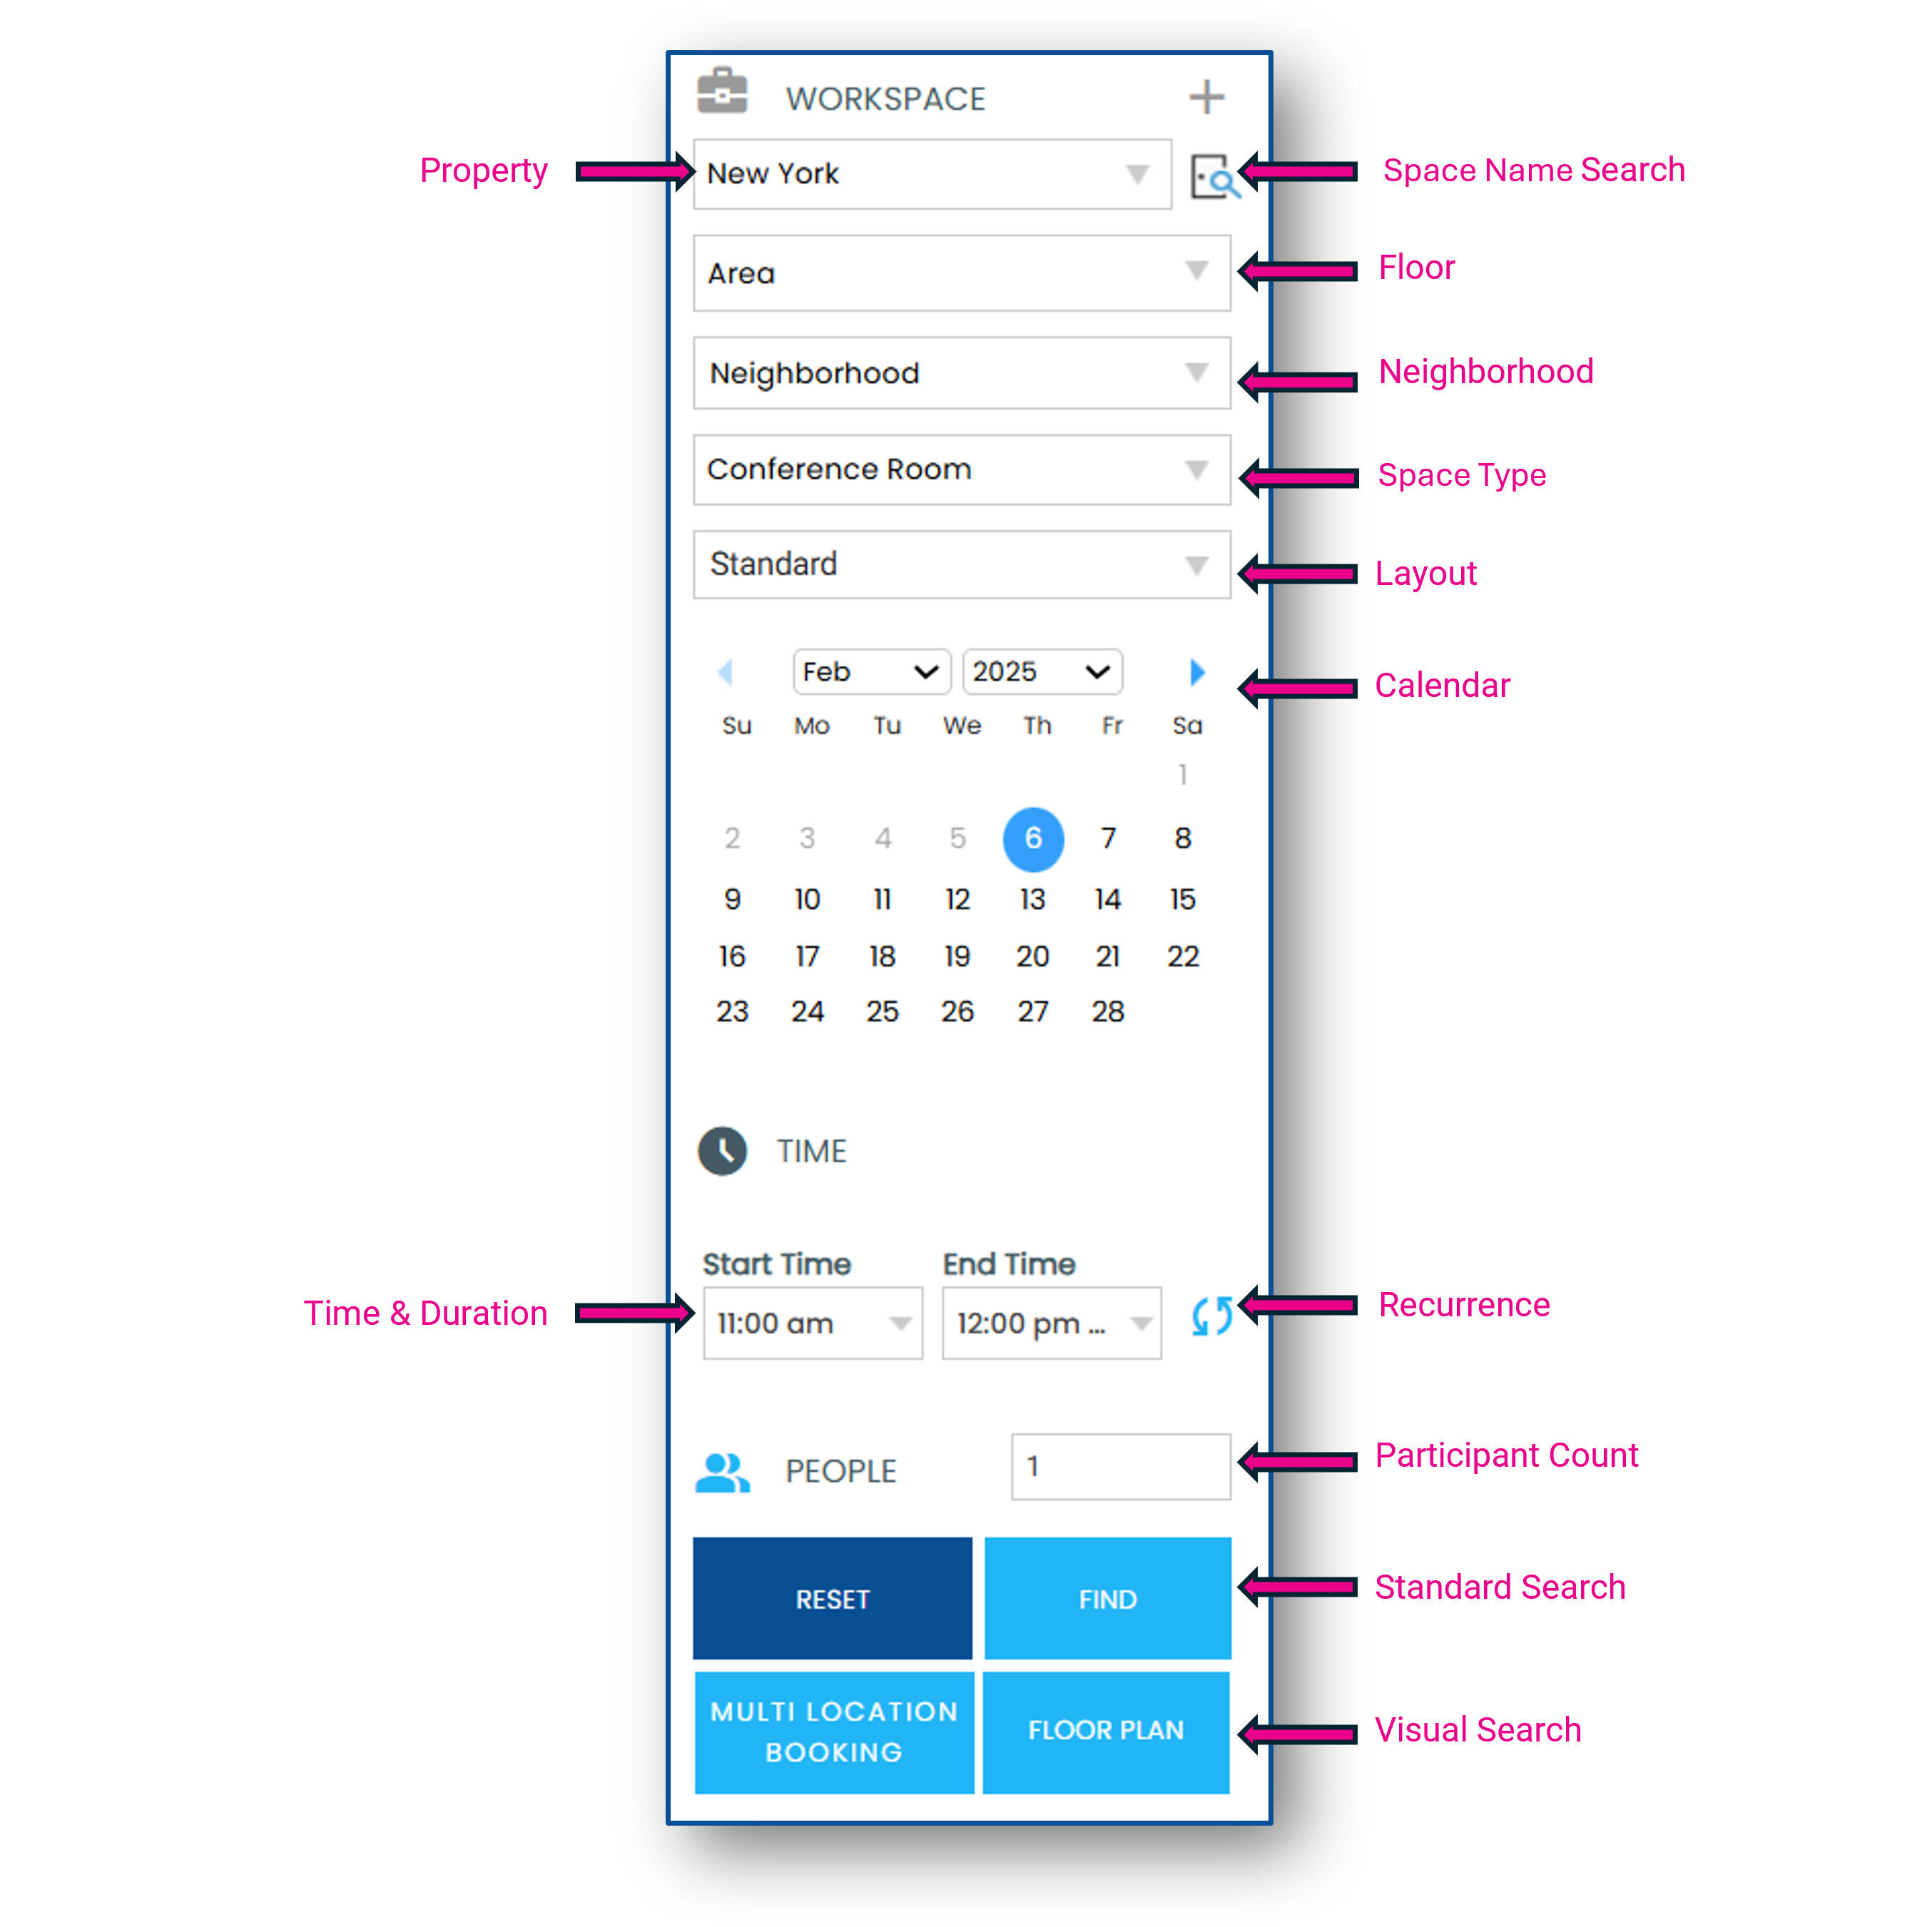
Click Floor Plan and select an available space
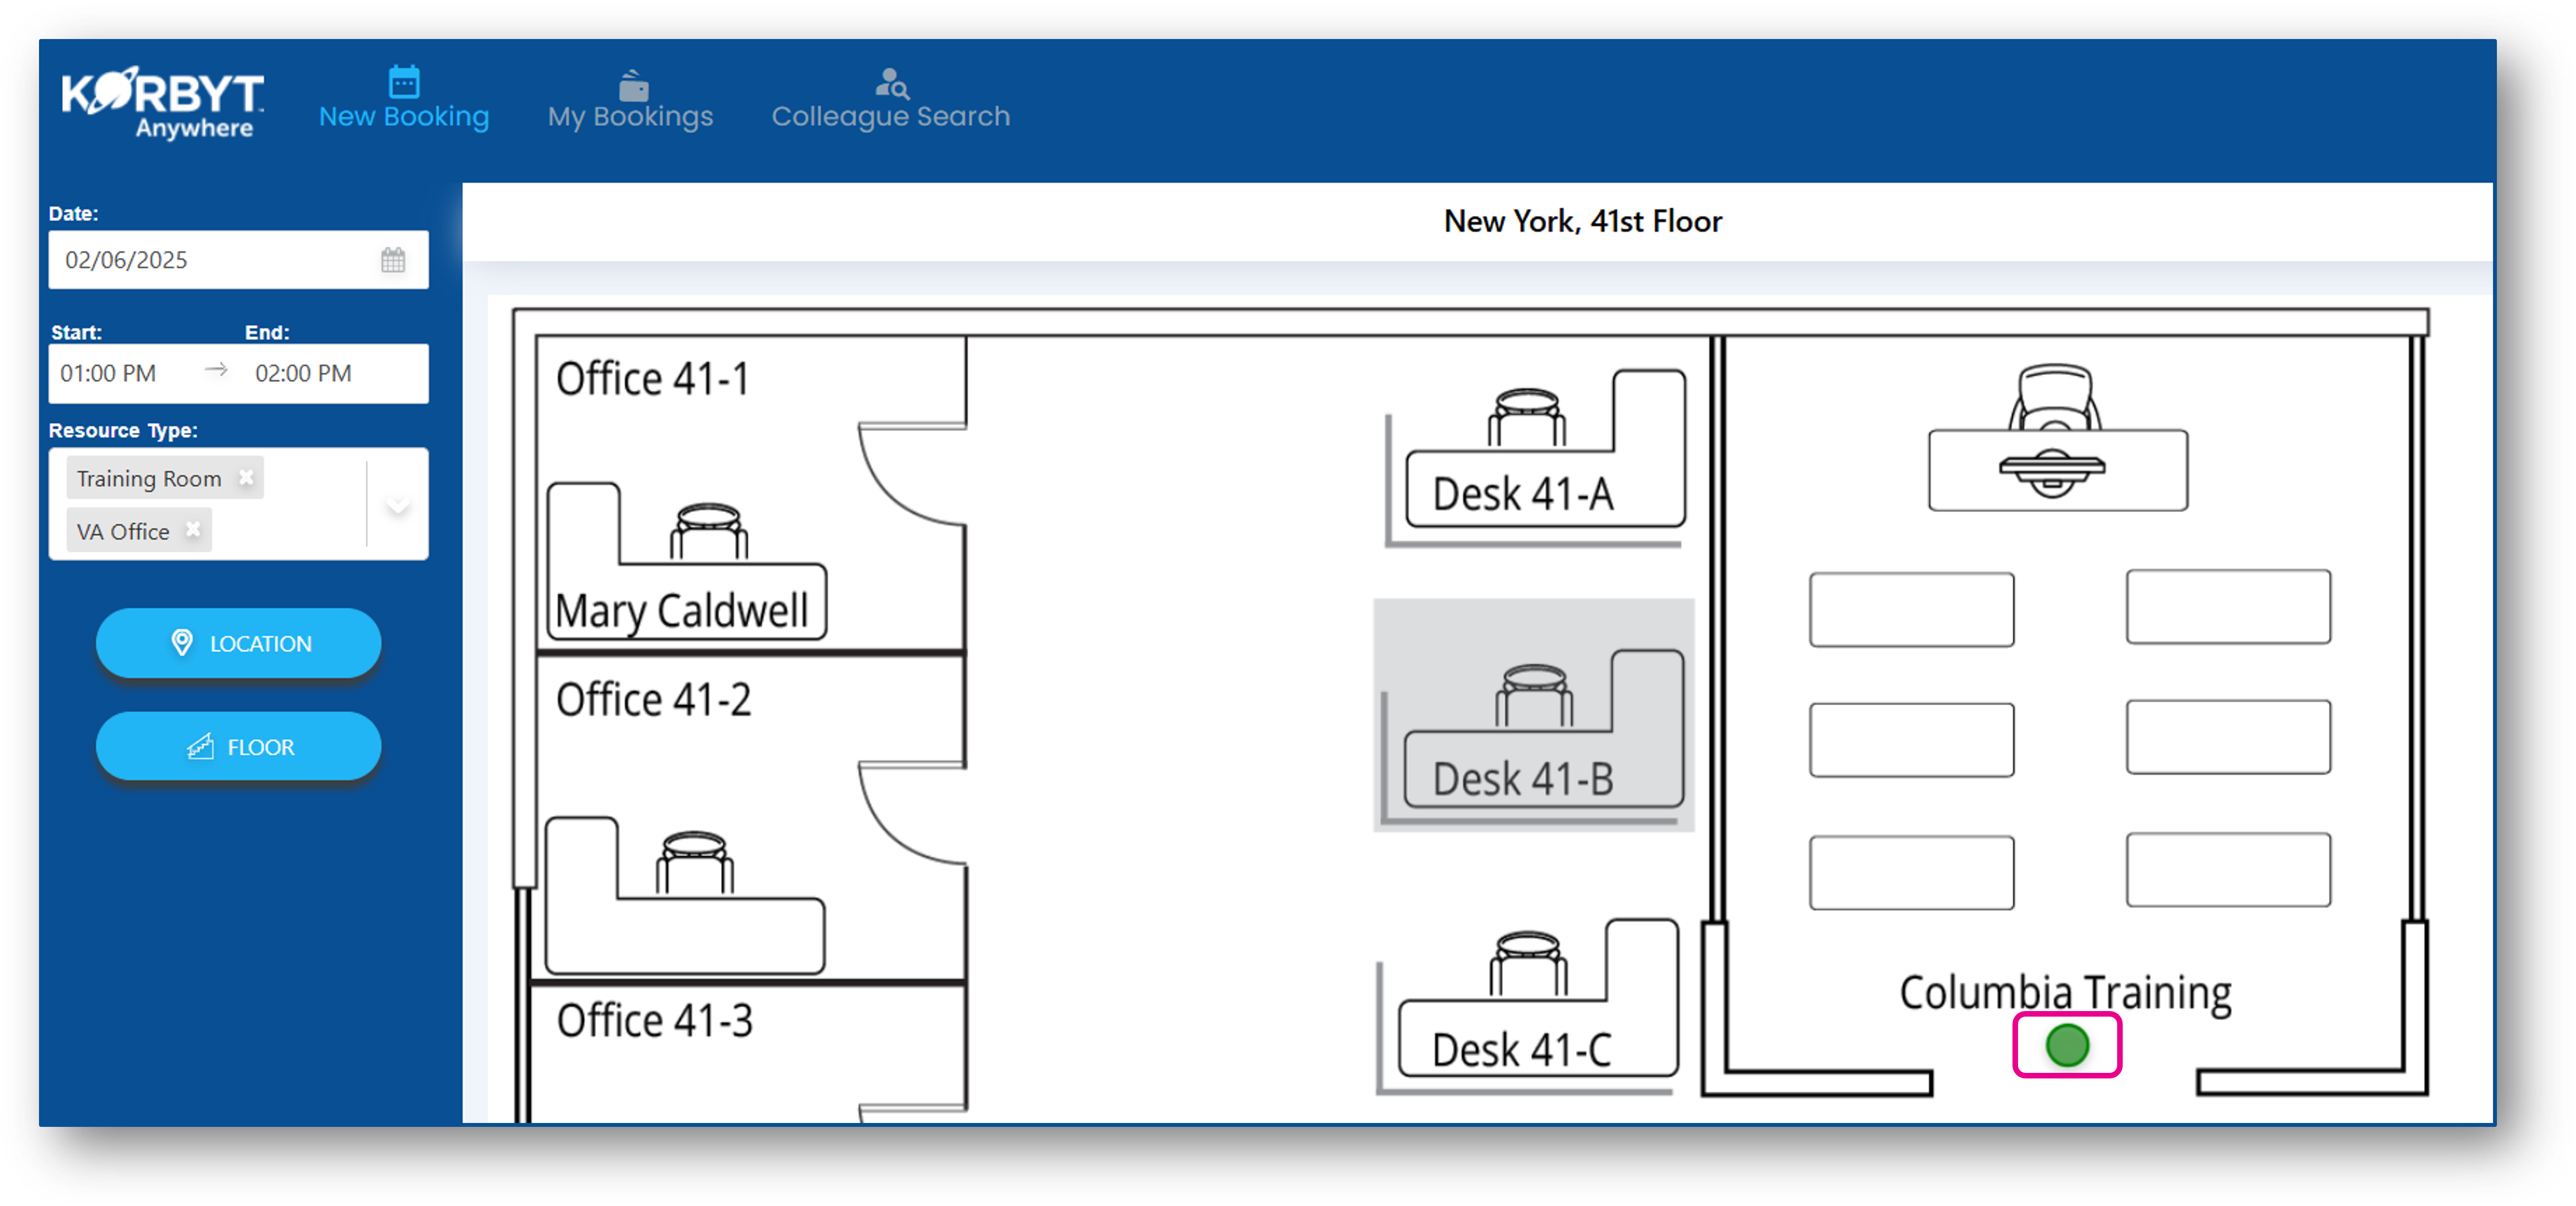
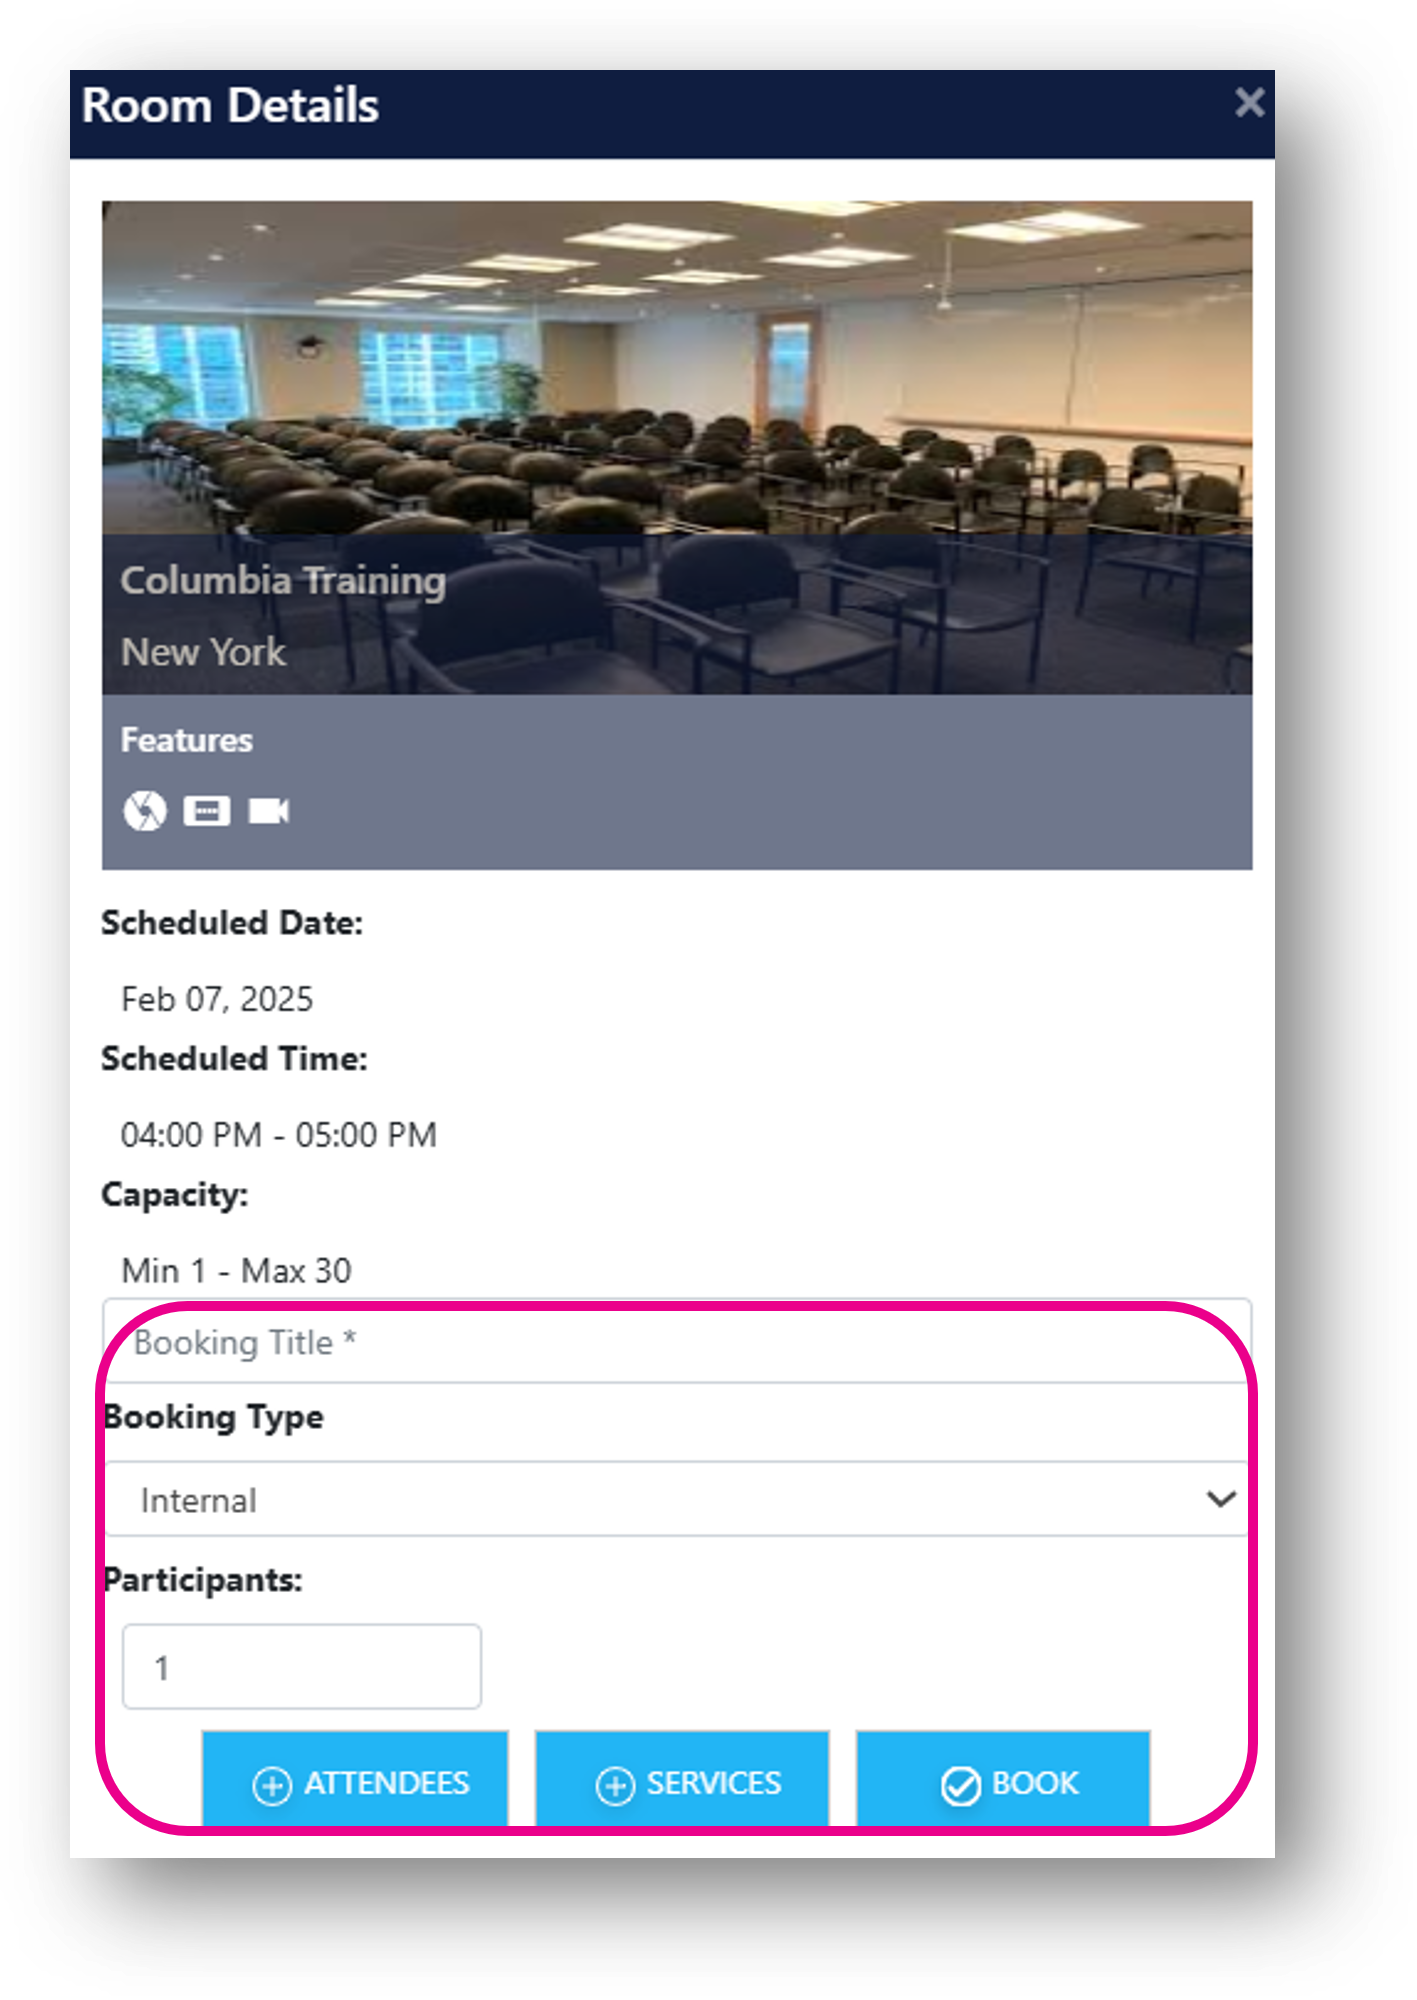
Complete the Booking Details, Add Services and/or Add People, and Book
How can I add Collaboration?
You can create a booking with an integrated video conference tool such as Zoom, Teams, or Webex.
Use the Search panel to identify the criteria for the space you require
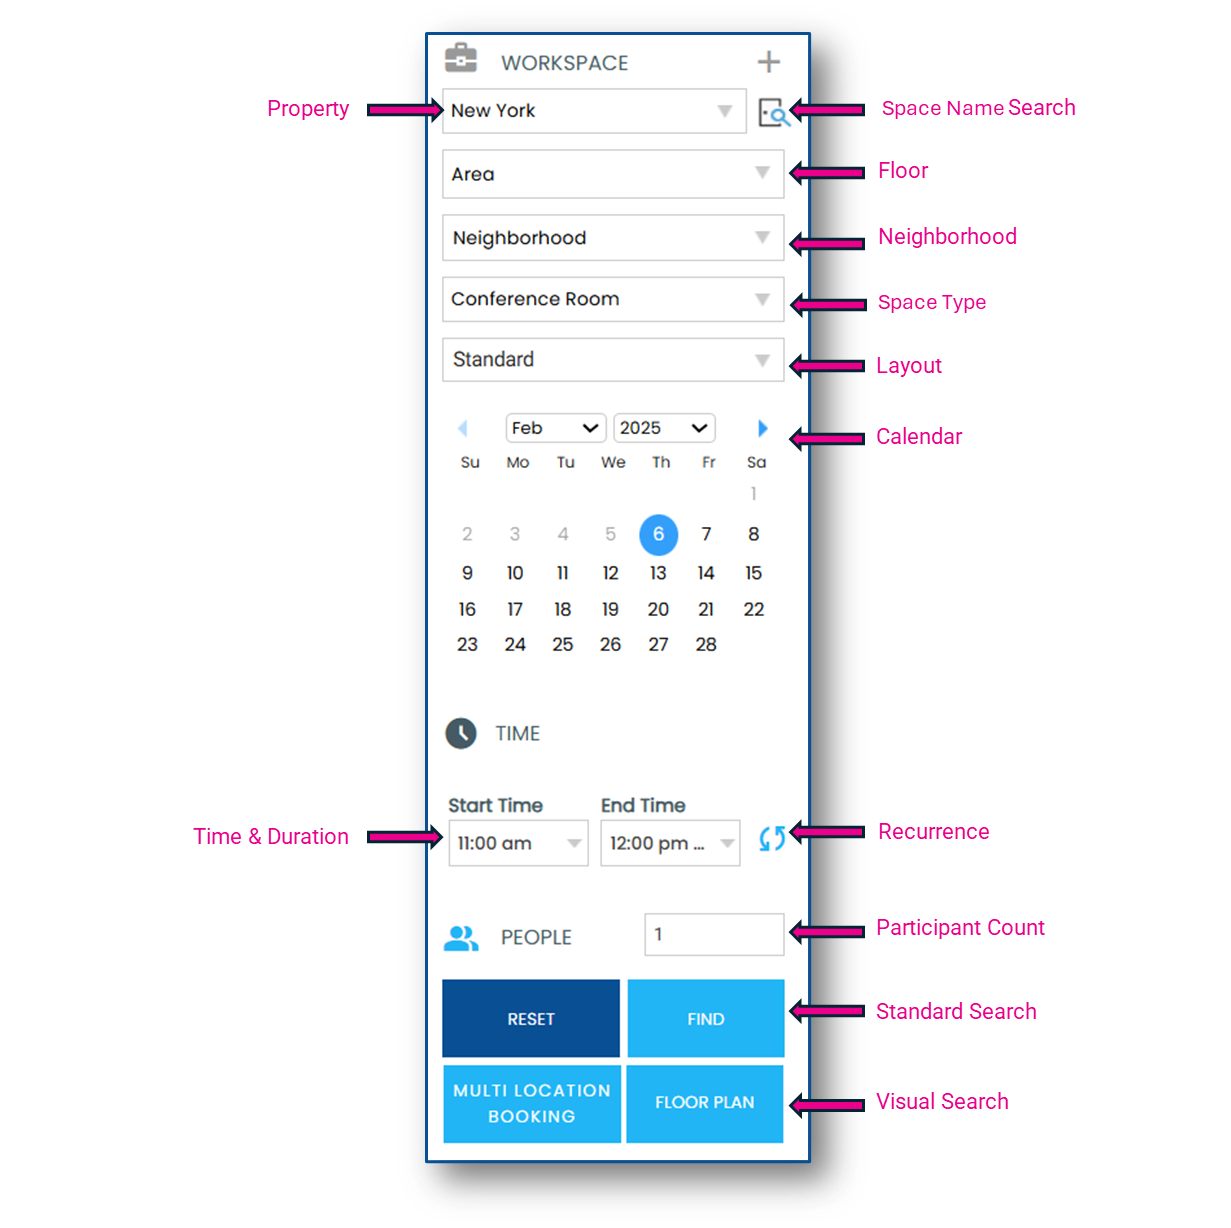
Select a space. If you would like to include services, see Add Services and/or Add Attendees
Click, Next
Complete the Booking Details, then use the collaboration dropdown to select the platform you would like to use: Zoom, Teams, or Webex
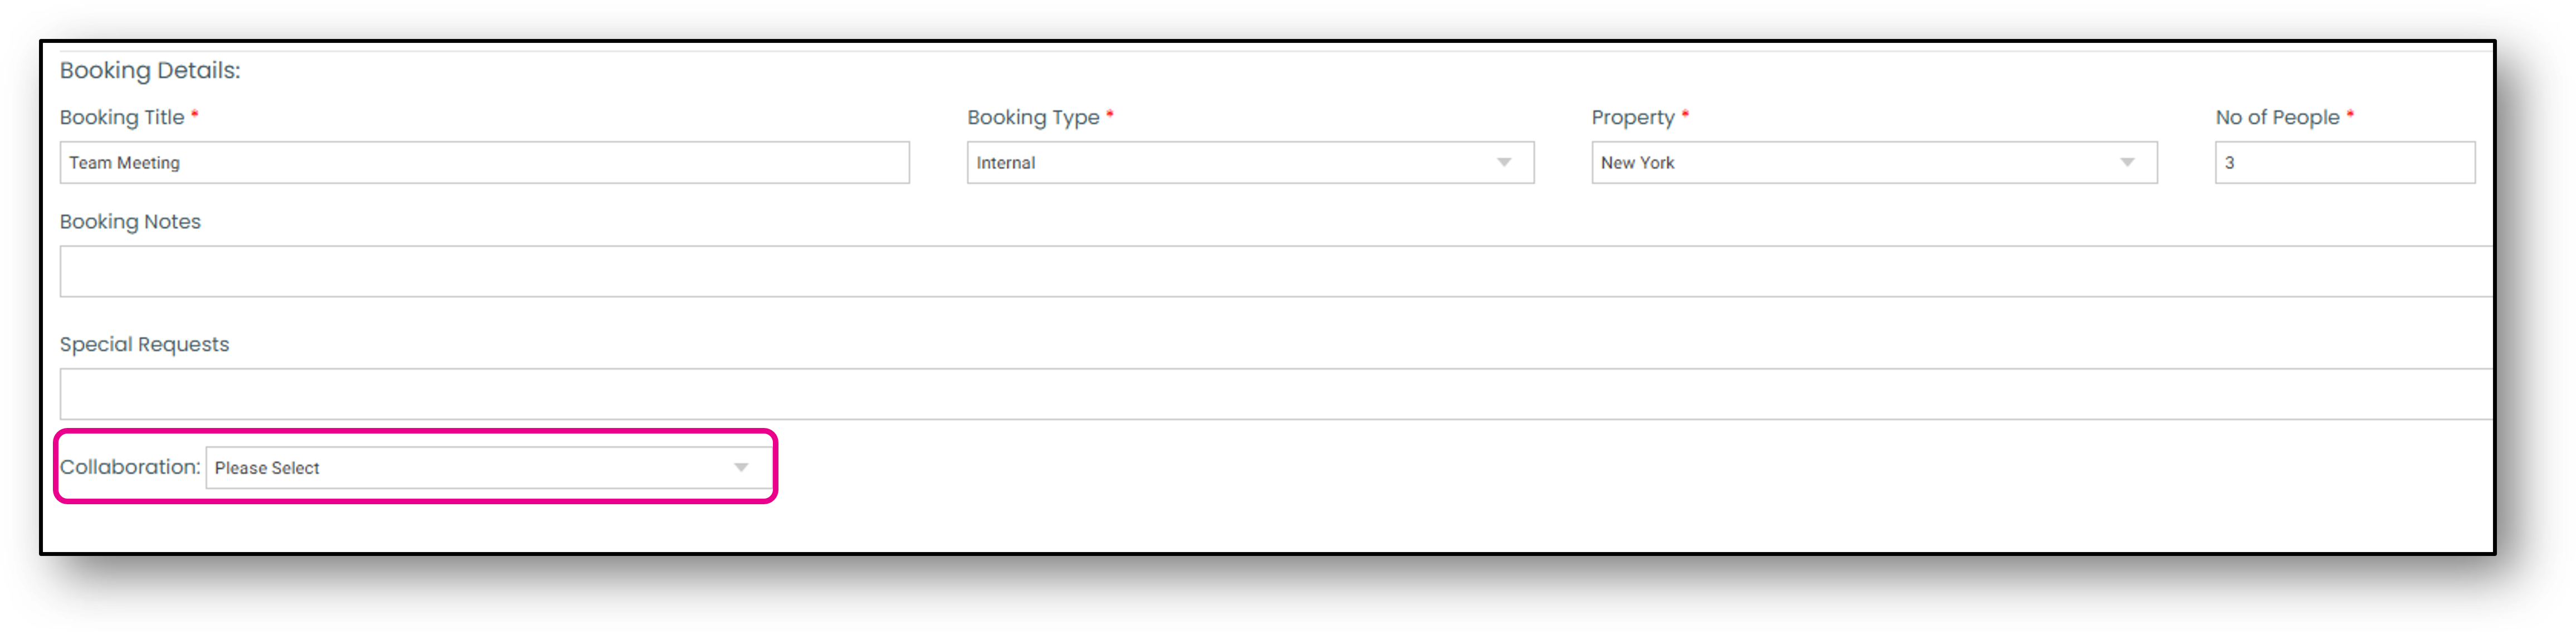
Click, Book

How can I create a Recurring Booking?
You can create a new booking as a repeating series of occurrences across multiple dates.
Use the search panel to identify the criteria for the space(s) you require
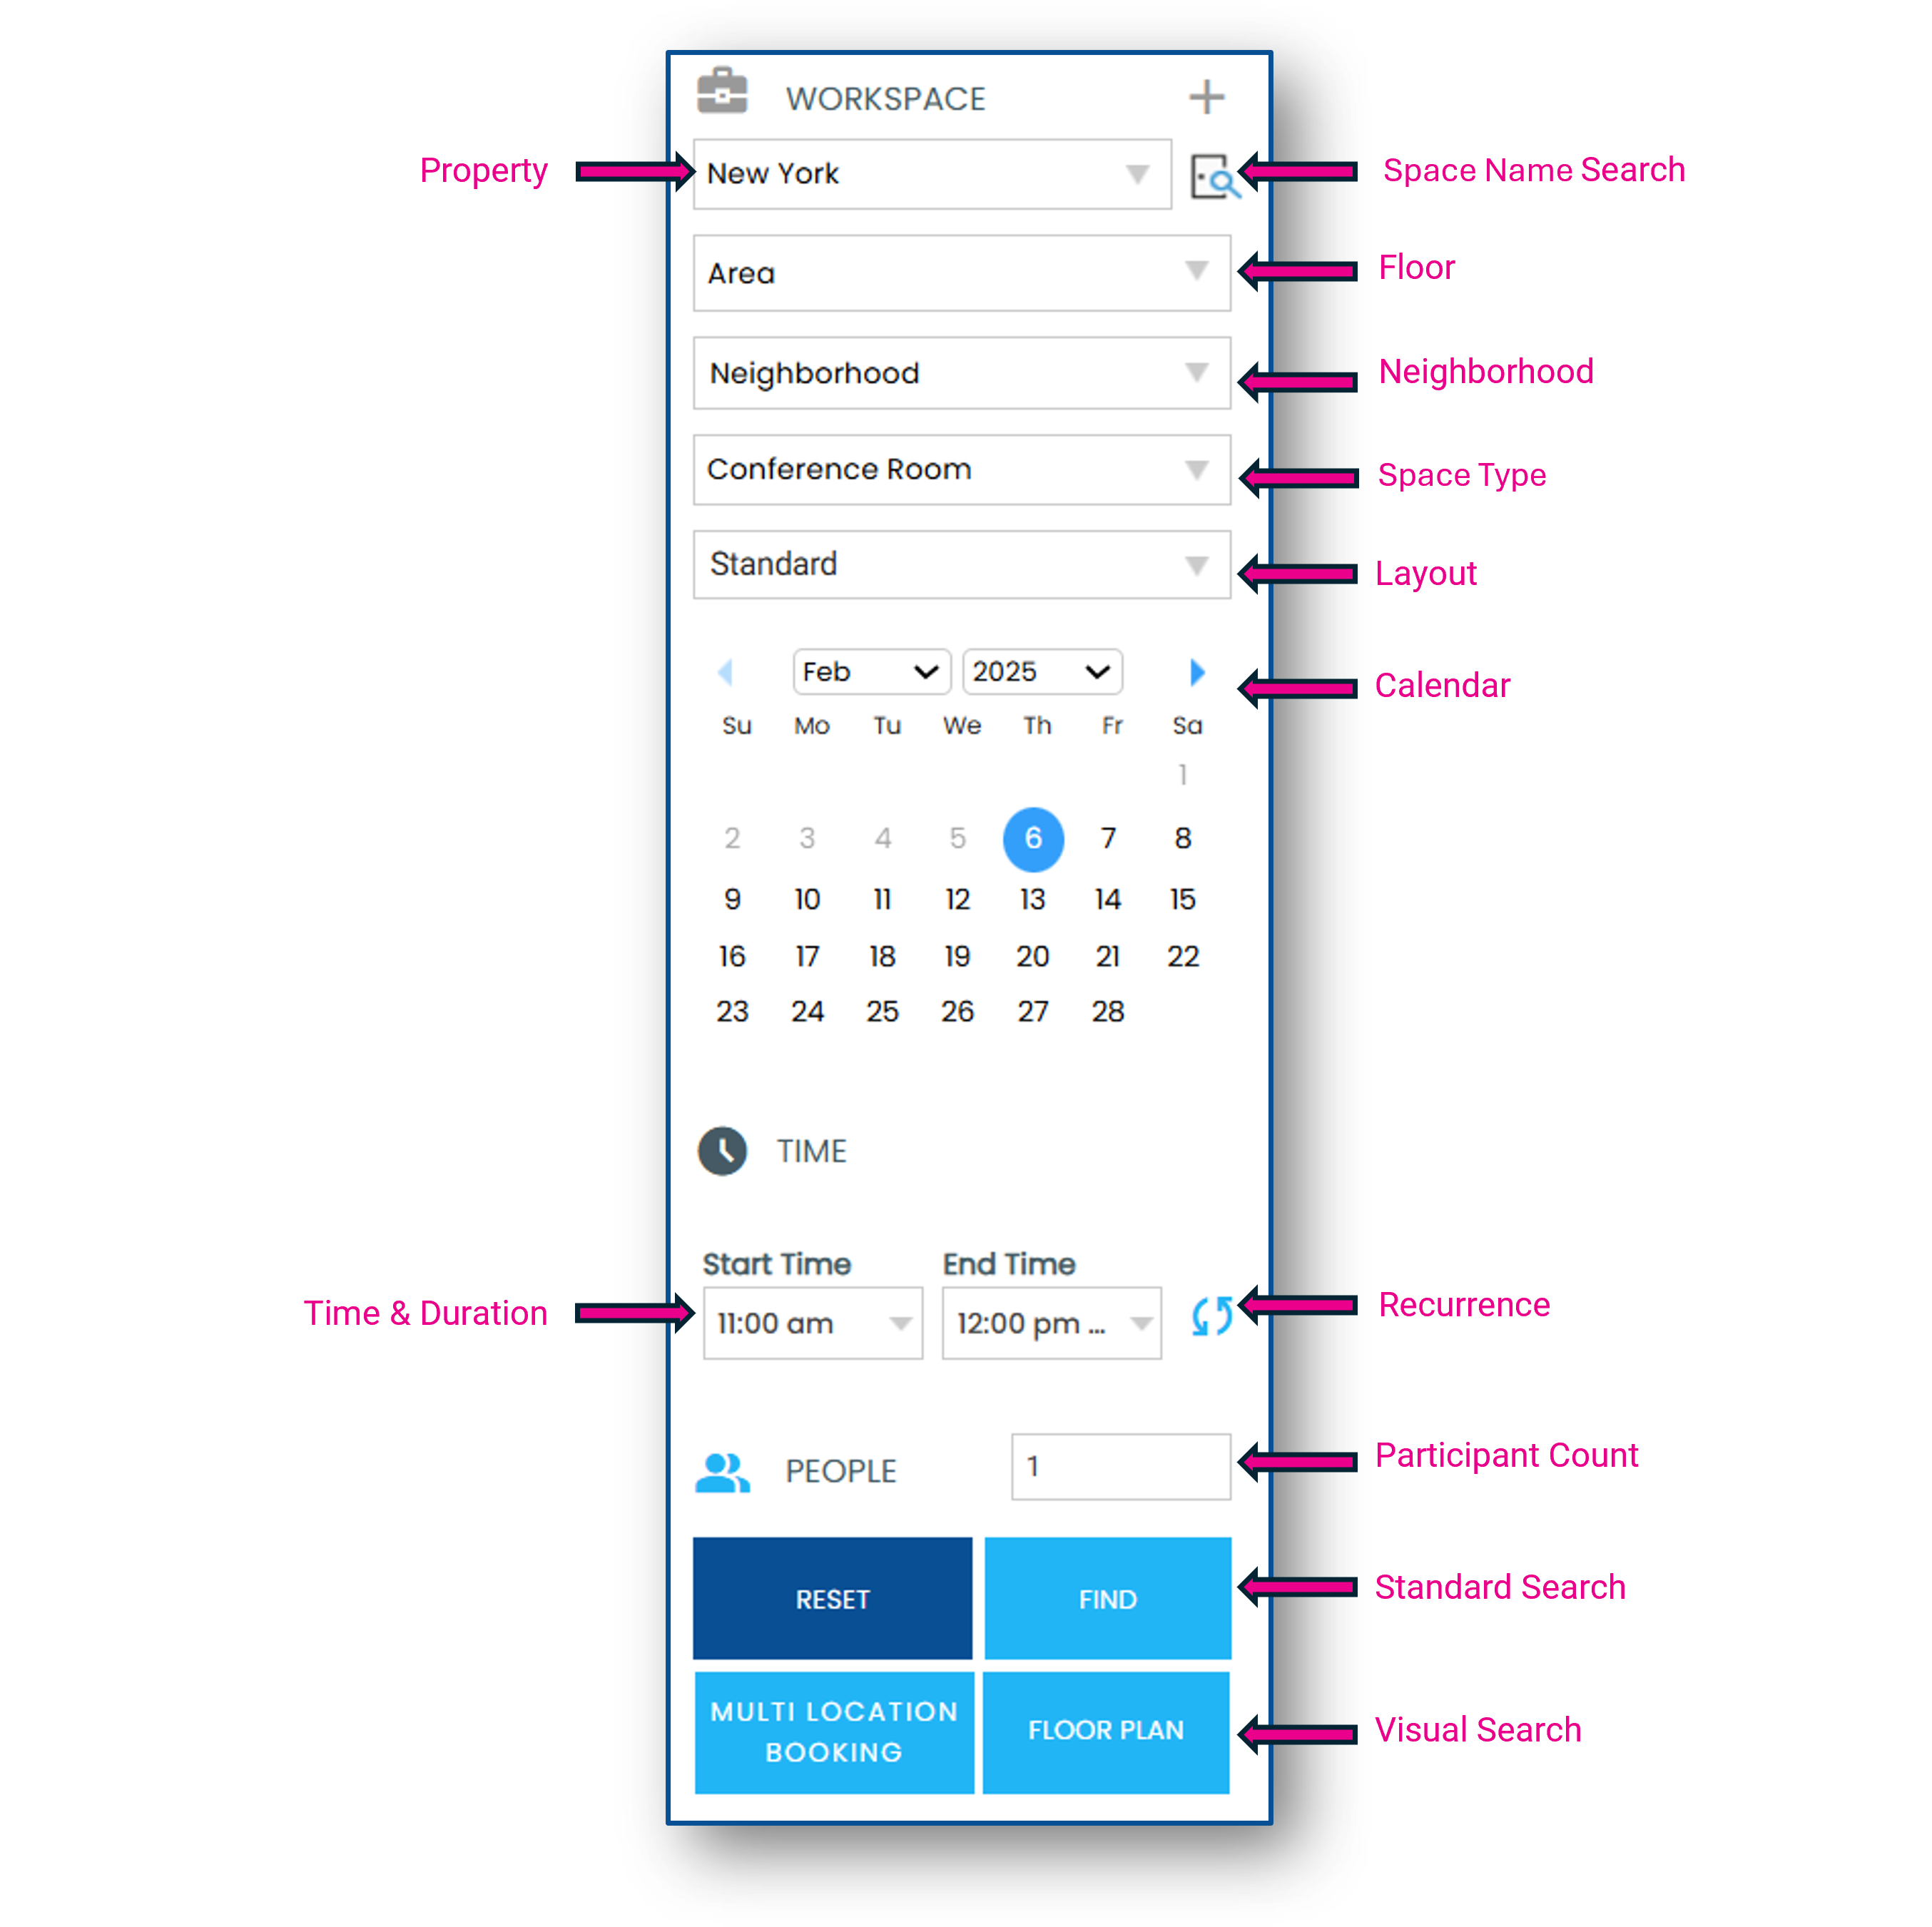
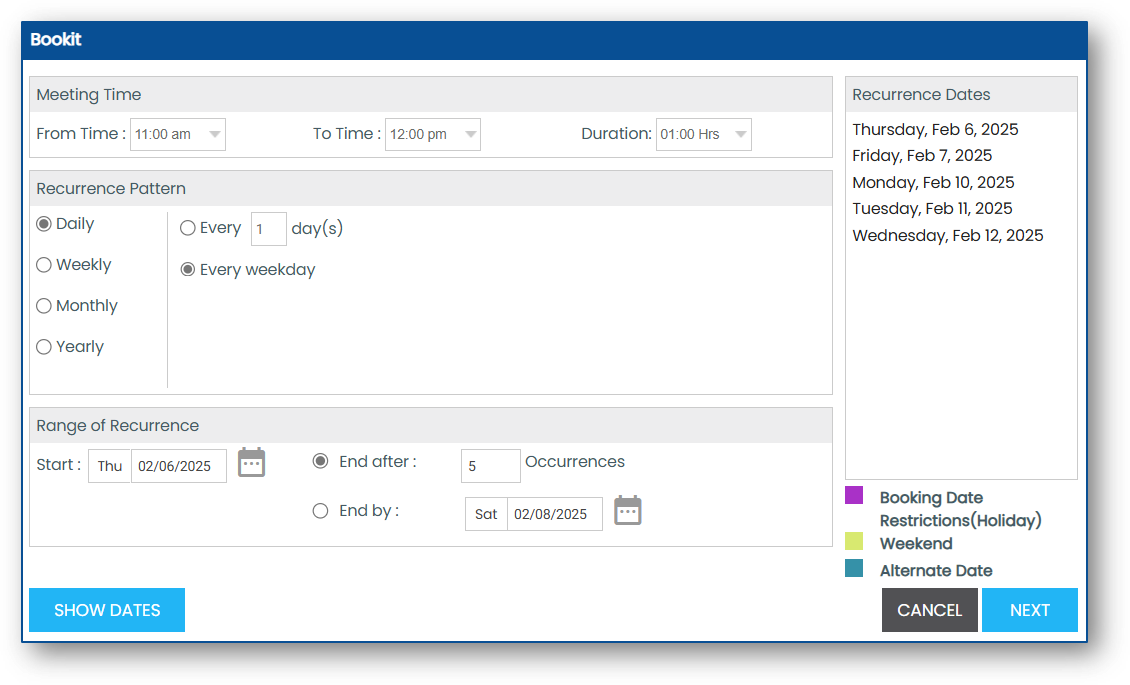
Click the Recurrence icon to establish your recurrence pattern
Click Show Dates, then Next to set the recurrence pattern
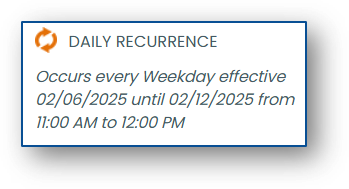
The chosen pattern will now display in the search panel
Continue to Create your Booking
How can I edit My Profile?
In My Profile, you can view how your name is displayed in the system, choose your primary property and language, and define your floor plan settings and favorites.
To view your profile, click on Your Name in the top right-hand corner and select My Profile
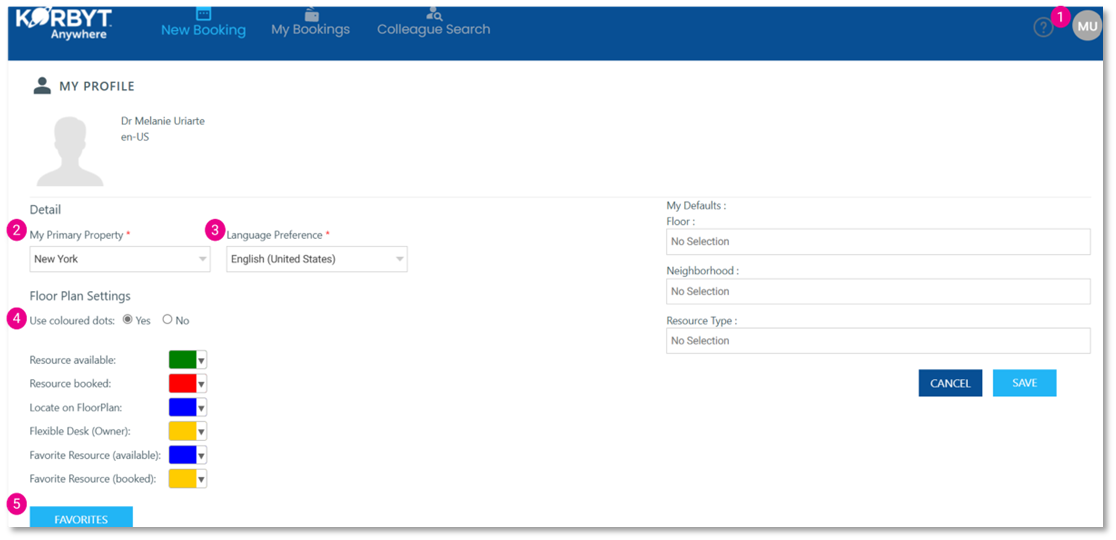
2. To set your Primary Property, select your preference from the My Primary Property drop-down and click Save
3. To set your Language Preference, select your preference from the Language Preference drop-down and click Save
4. To display symbols on your Floor Plan, go to Use Colored Dots and click No then select your preferred symbols and click Save
5. To set your Favorites, click Favorites, complete the search criteria, select the spaces to add to your favorites, and click Save.
How can I create a booking with Multiple Spaces?
Within Korbyt Bookit, you can book multiple rooms at one property at the same time.
Use the search panel to identify the criteria for the space(s) you require
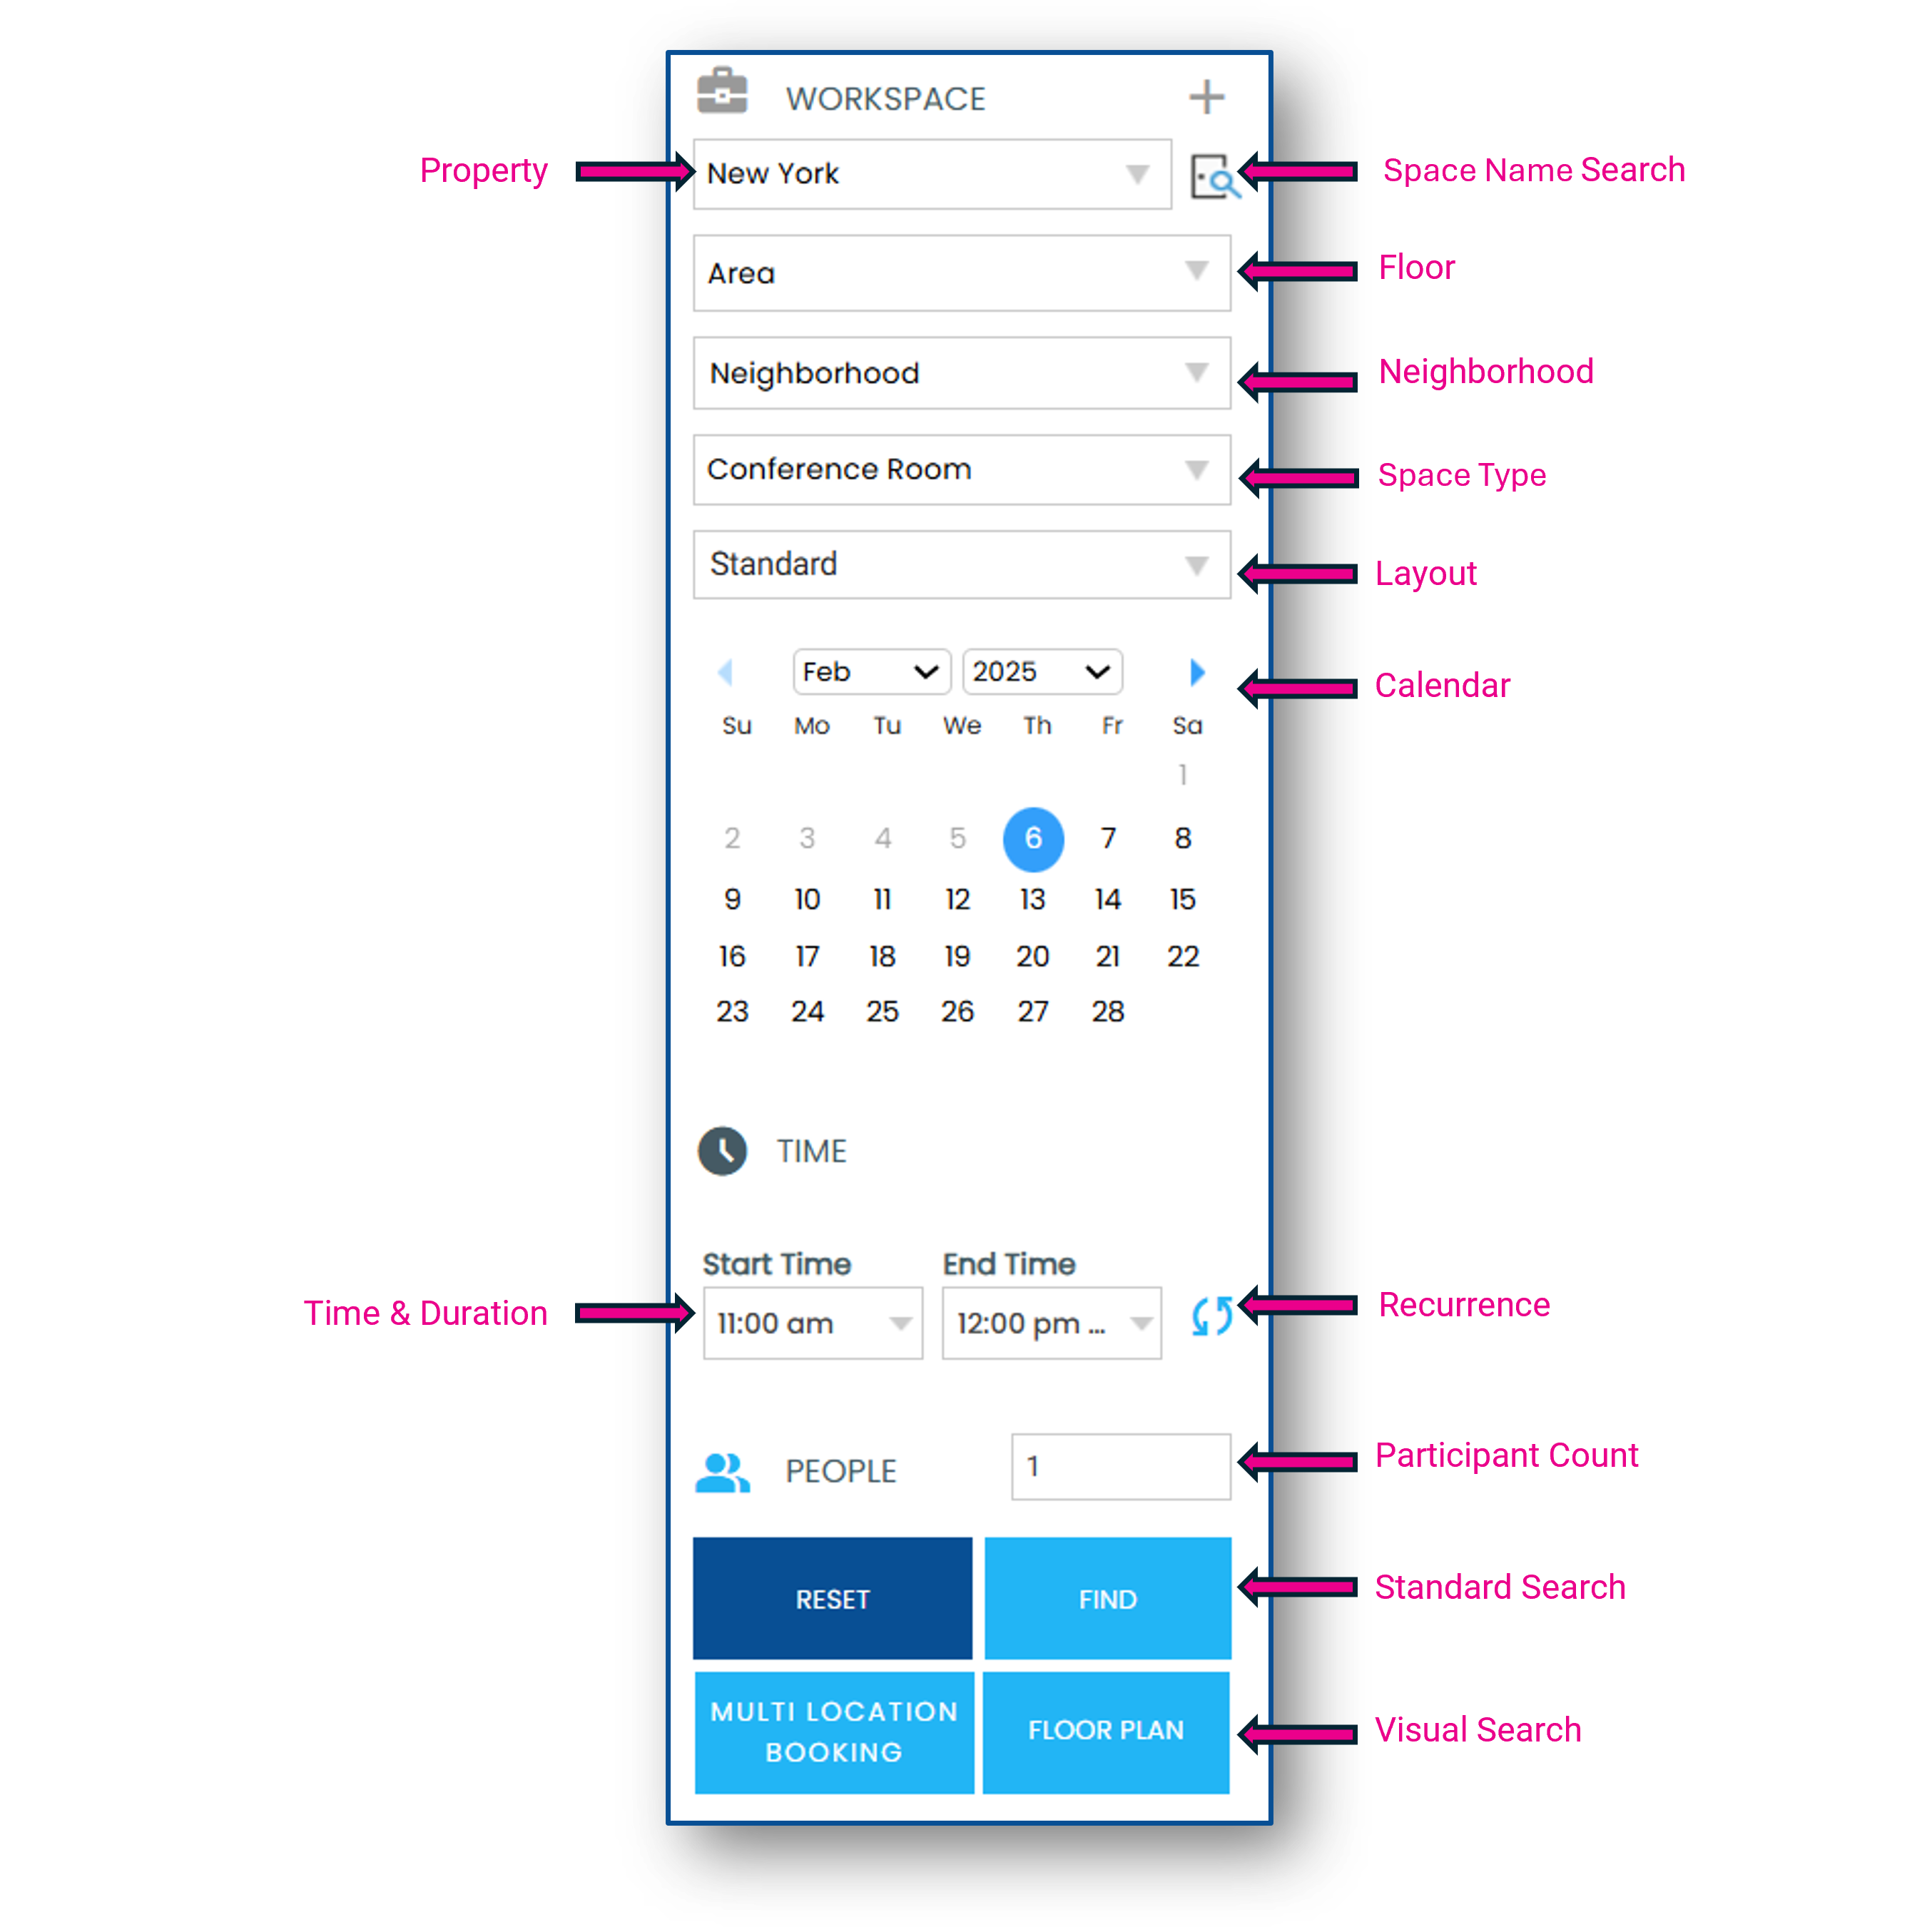
Find starts a standard search and shows a list view of matching spaces
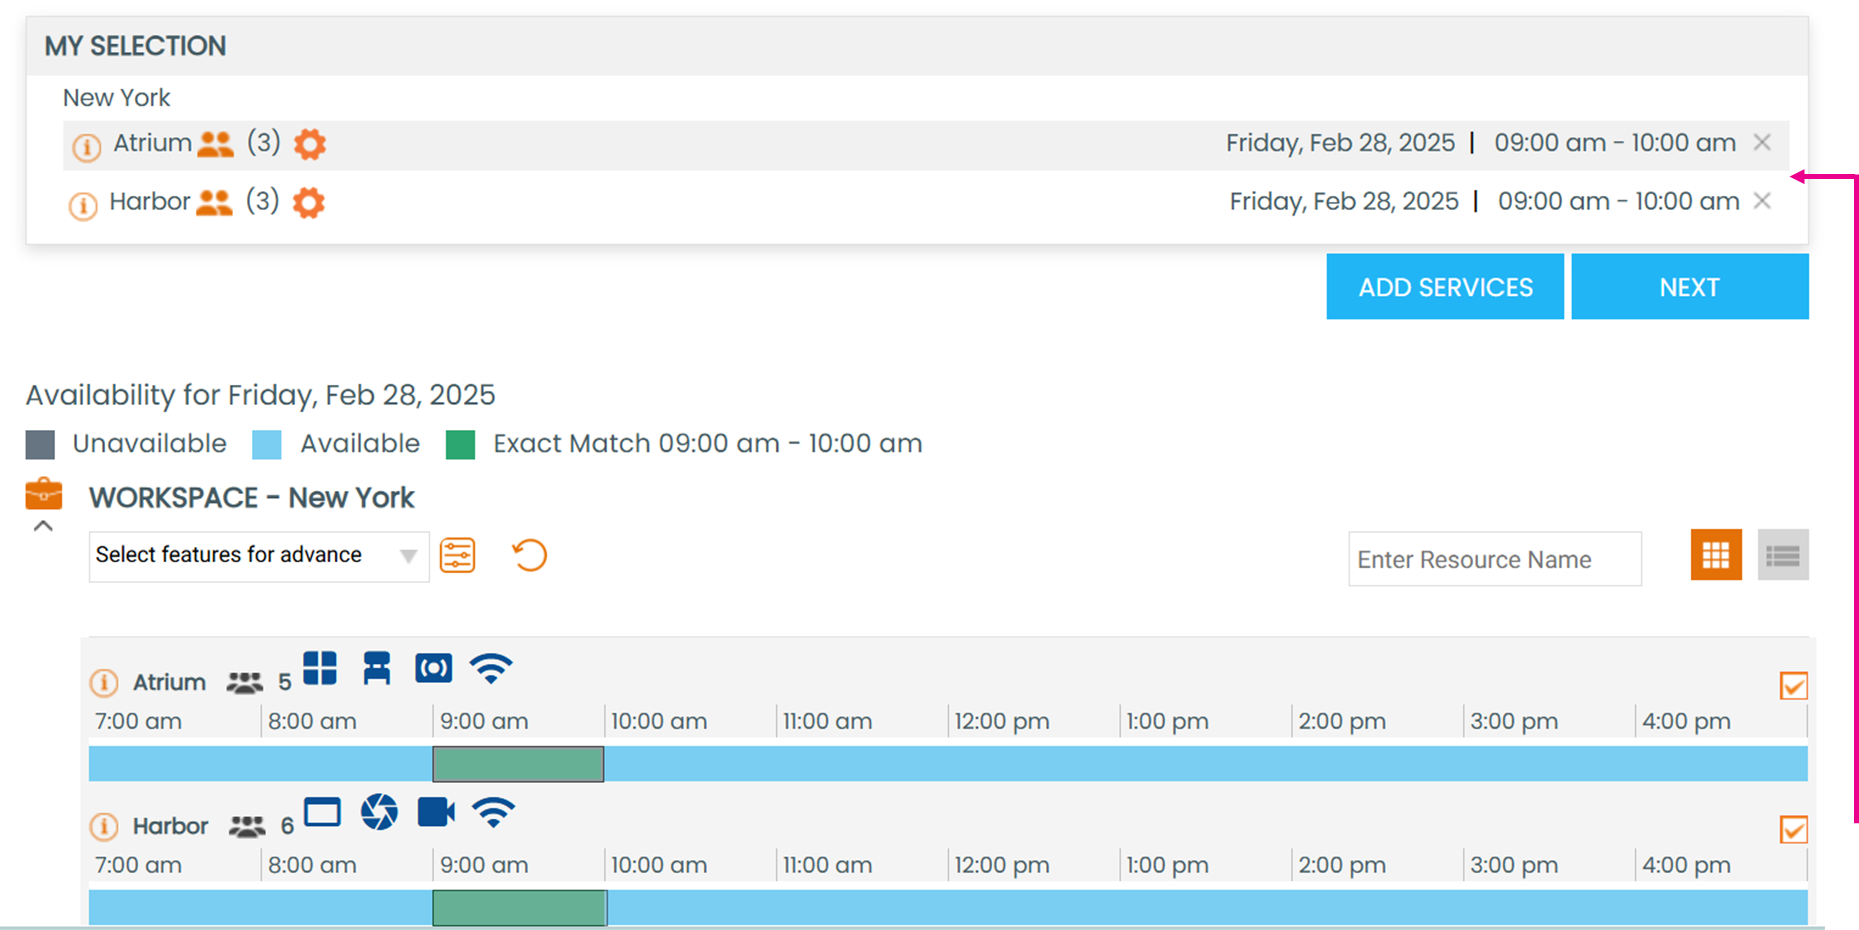
Selecting Multiple Spaces
Click the exact match time slot in each space you want to add to your booking, or click the checkboxes to the far right of each space. Your selected spaces will appear under My Selection at the top of the screen.
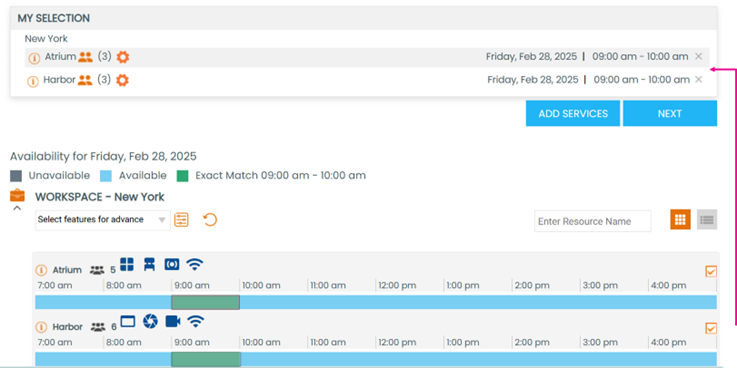
You can choose to Add Services, Add People, or click Next to proceed to the Booking Summary screen and complete your booking.
How can I create a Multi-Location Booking?
You can book spaces at multiple locations at the same time.
Click the Multi-Location Booking button or click on the + button at the top of the Search Panel.
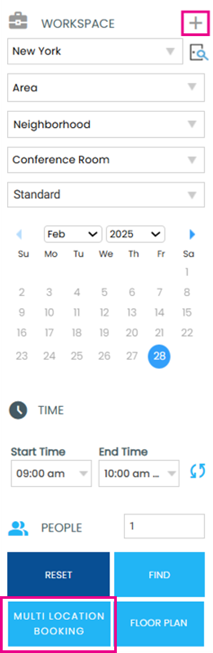
In the Multi-Location screen, select the Properties you wish to book and complete the required fields
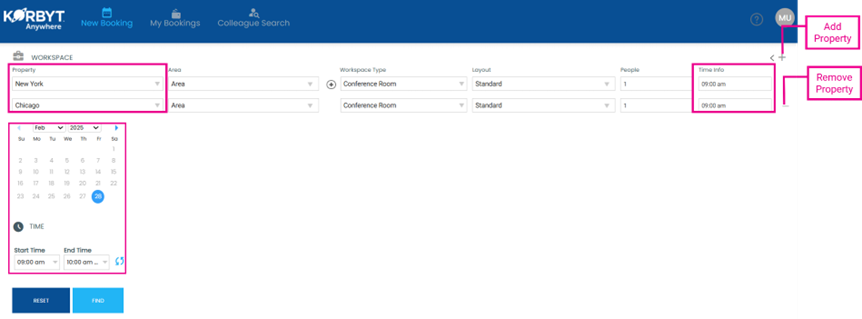
To add more properties/spaces, click on the + button in the upper right-hand corner, and to remove properties, click the - button
Choose the Date and Time, then click Find
Use the drop-down to see the list of spaces at each property
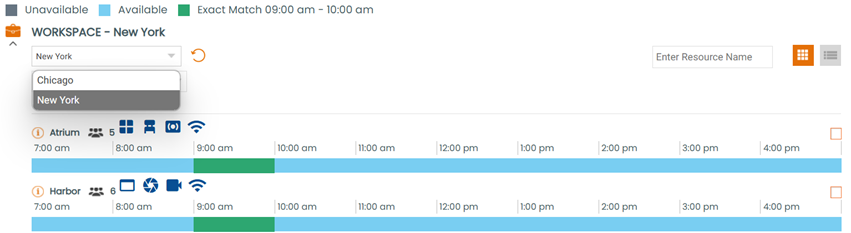
Make your selection of spaces, then you can choose to Add Services, Add People or click Next to proceed to the Booking Summary screen and complete your booking
How can I cancel my booking?
There are multiple ways to cancel your own booking.
Your ability to cancel a booking depends on your rights within Korbyt Booking.
Cancel via the Web
Navigate to your Korbyt Bookit site, click on My Bookings
Click the X next to the booking you would like to cancel
In the pop-up, click Yes to complete the cancellation of your booking

Cancel via Outlook
Outlook Calendar Screen
Within the calendar screen, right-click on your appointment and choose the Cancel Meeting button
Outlook Appointment Screen
Open your appointment via the calendar, and in the top right corner, click the Cancel Meeting button
How can I view My Bookings?
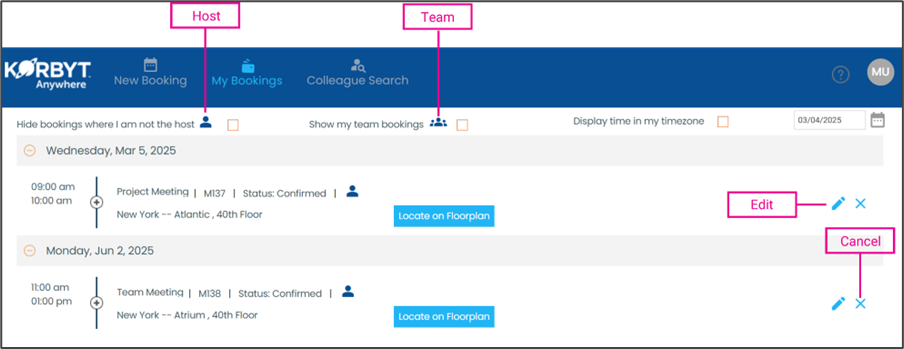
The My Bookings screen shows all future bookings you have created.
Click the My Bookings button
To only view bookings where you are host, click the checkbox next to the host icon
To only view team bookings (if in use), click the checkbox next to the Teams icon
To edit a booking, click on the edit icon to open the booking and make the necessary changes
To cancel a booking, click on the X icon
How can I book a space near my Colleague?
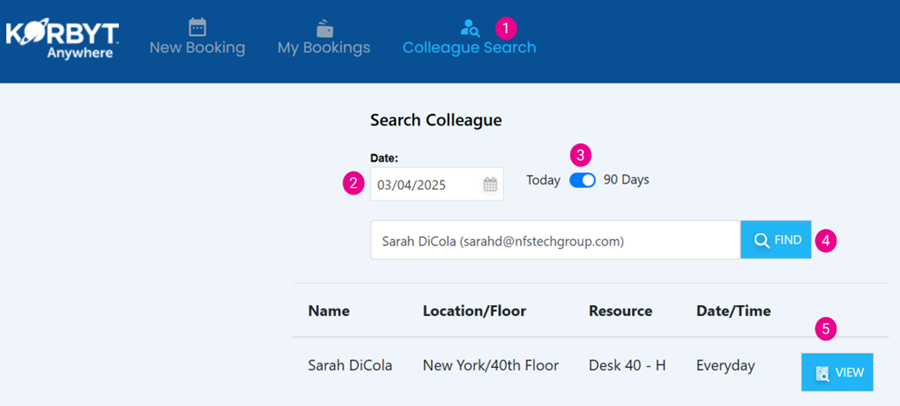
The Colleague Search function identifies the location of a colleague on the Floor Plan. Users can view where their colleagues will be working on a given day at a specific time. This allows users and teams to book spaces near each other on the go. This function applies to colleagues with Bookings or those with an assigned space within the Korbyt Booking system.
Click the Colleague Search tab
Select a Date
To view the next 90 days, use the toggle
Enter your colleague’s name, click Find
Select View next to the relevant booking
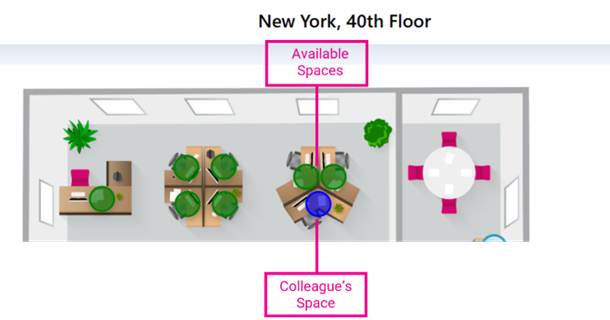
Your colleague’s booked space will display a Blue dot (or pin if enabled) on the Floor Plan
You may click the Green dot (or your enabled icon) of an available room or desk nearby. Complete your booking as usual.
How can I create a Private Booking?
When creating a booking that needs to be kept confidential, a user can turn it into a Private Booking. Information about the booking is hidden in the main Korbyt Booking web application’s calendar view. The booking title will display as a Private Booking. The availability of this option will depend on user permissions.
Use the Search Panel to identify the criteria for the space you require
Select a space, then click Next
To create a Private Booking, select the checkbox next to Private and then click Save