SSO (Single Sign-On) Options in Korbyt
this artcile reviews the way to configure SSO for user managment in Korbyt
Written By Ed Kinne
Single sign-on (SSO) for Korbyt CMS enables you to use your existing corporate user/password details when logging in to the Korbyt CMS. It avoids the need to keep password details updated in the CMS and simplifies connecting to the CMS for users already logged in to their corporate network.
Korbyt supports both Azure AD and SAML 2.0
Review the specific section for your deployment (you can select a service using the navigation menu on the right.
Azure AD Integration
Korbyt Anywhere provides integration with Azure AD for secure and scalable user management and single sign-on, allowing a customer’s employees to login to the Korbyt Anywhere CMS, using their Azure AD credentials.
This process will require configuring both your Korbyt Tenant as well as your Microsoft Azure services. Your IT Department, as well as Korbyt Professional Services will likely be involved in the process.
This document provides high-level insight into the process steps.
There are three main steps in the setup process:
Granting Access: In your MS Azure service, you must grant Korbyt Anywhere access to the desired Azure AD groups
In Azure – Registering an app on the Azure app registration portal
In Azure – Confirming permissions for Microsoft Graph on the app
Microsoft Graph API permissions are required for integration with Azure AD
This article lists the specific Microsoft Graph API Permissions Required by Korbyt
In Azure – Obtaining Administrator consent
In Azure – Generating a Client Secret
Recording the details from these steps as they will be used in Korbyt to create the connection
Importing CMS Users Through Azure
CMS Users are those who will log in to the web portal to manage the platform.
Further down this article you will find details about importing End Users, those that will only be logging into the Desktop or Mobile Applications
If someone is both a CMS and End User they will need to be imported through both setups
Importing Users: Inside Korbyt Anywhere, setting the information so that Korbyt can automatically create a corresponding CMS user for each employee it detects in the customer’s designated Azure groups
In Korbyt – Enter User Import Parameters
In the New Side Bar UI, open or hover over Advanced, then select Directories
In the Classic UI, open the Mega Menu, in the Advanced section, select Directories
On Directories, select if you are using Azure AD or a different IDP
For IDP
Turn on the Services you wish to use

Then configure the information required for that service
Enable SSO for CMS

Enable SSO for ECA(OIDC) - Korbyt Mobile and Web

Enable SSO for ECA (SAML) - Korbyt Mobile and Web

Customer Expiration for SSO Access Tokens

Automatically Archive Inavtiev ECA Users - Korbyt Mobile and Web

For Azure AD
Click the pink +Add New Azure Users button and enter the details you established in the first steps
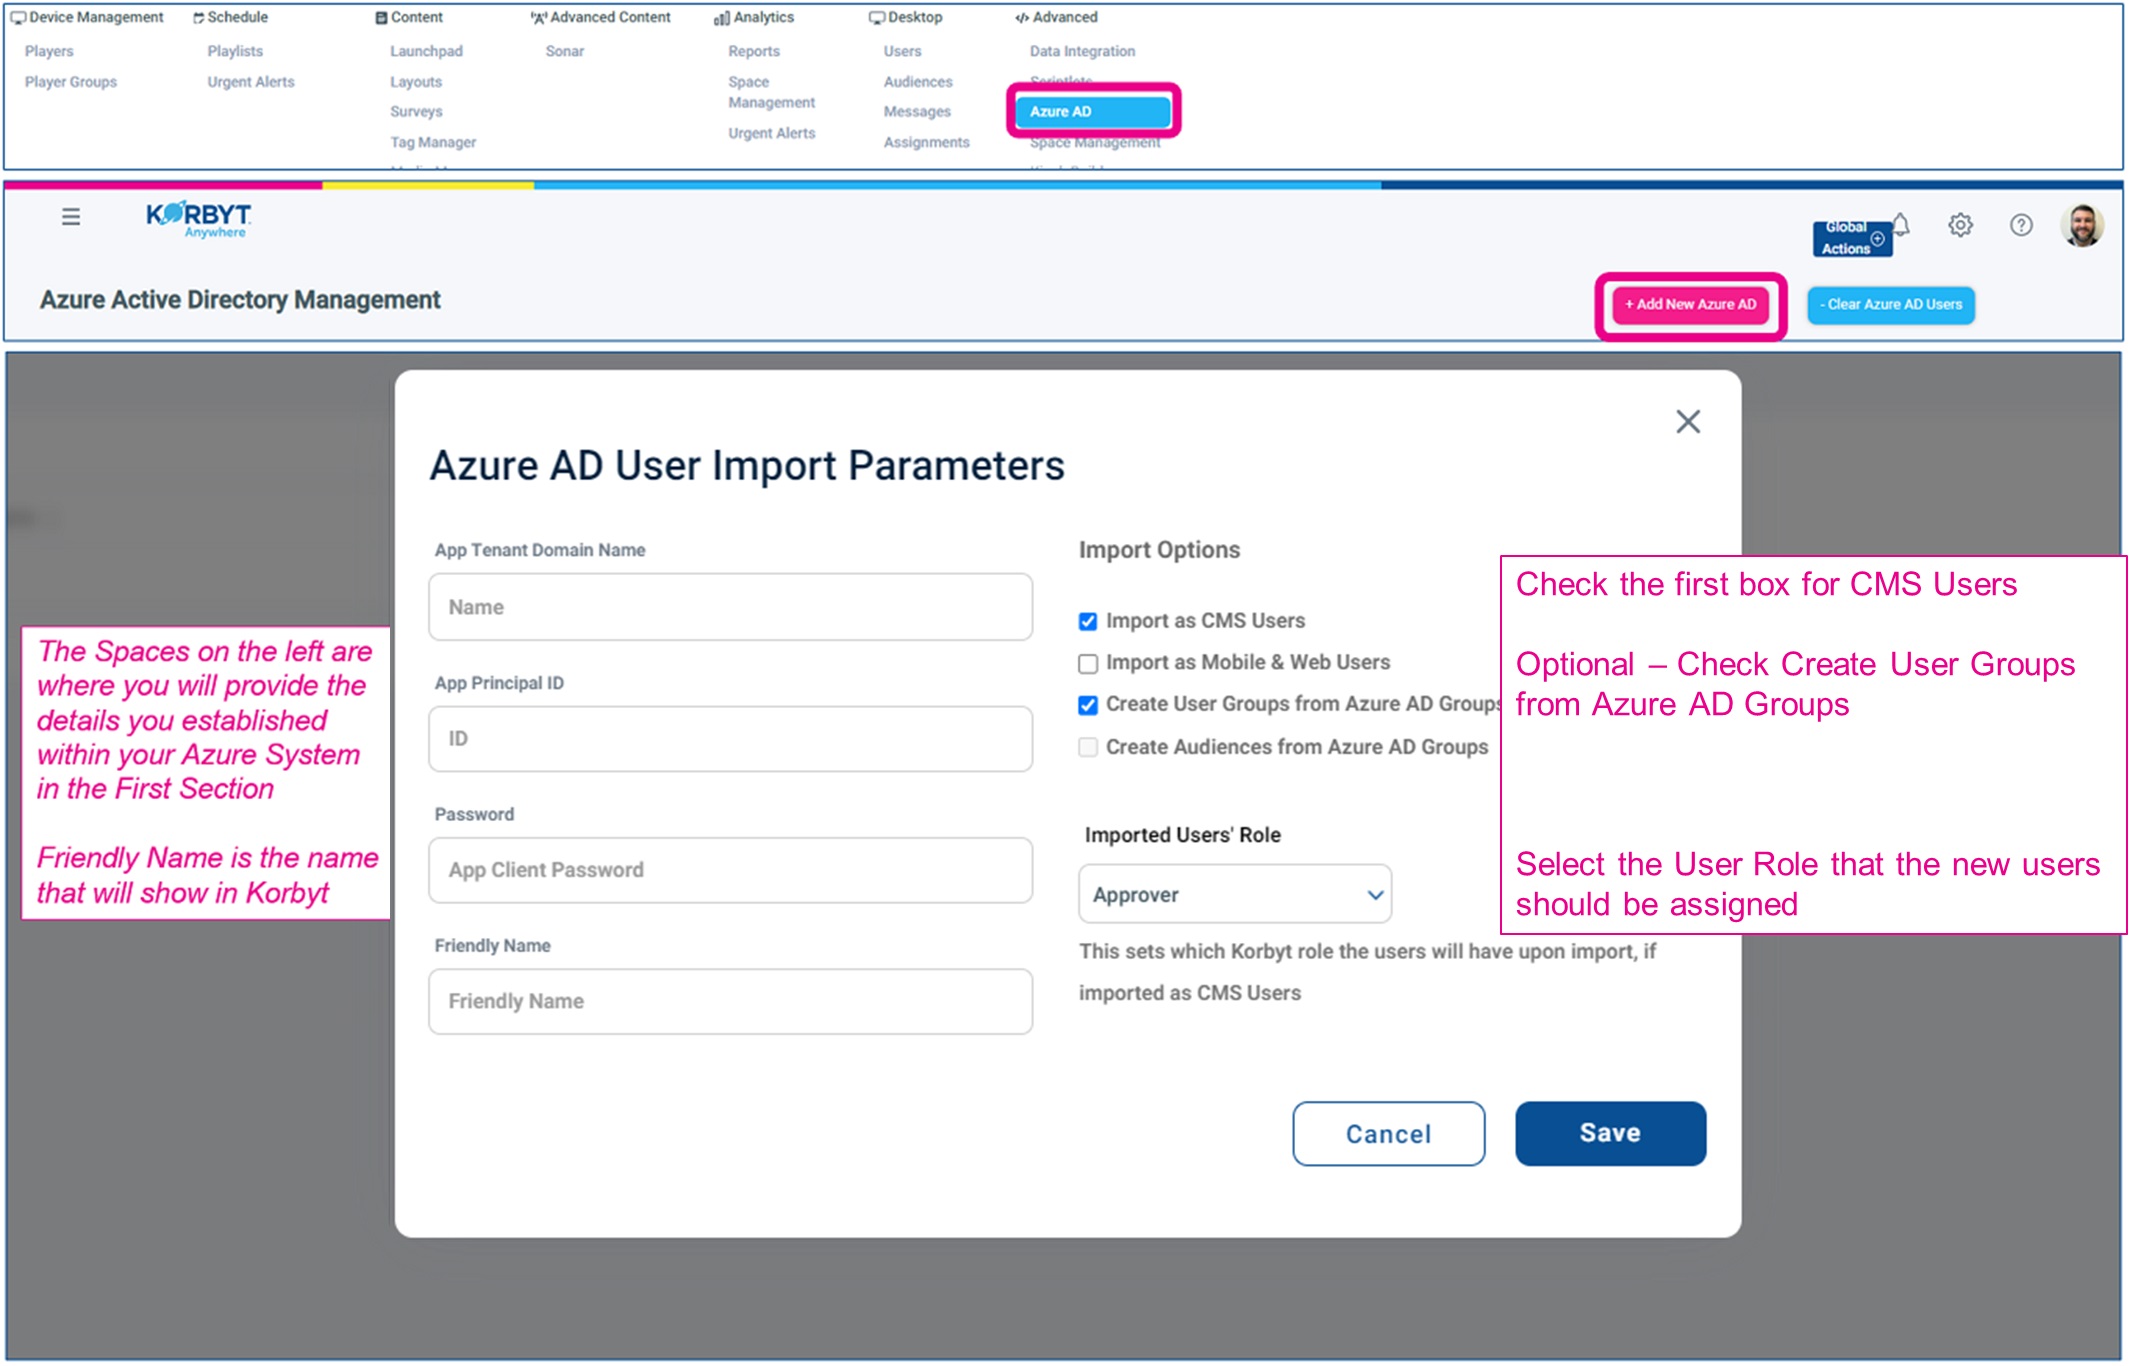
Click Save
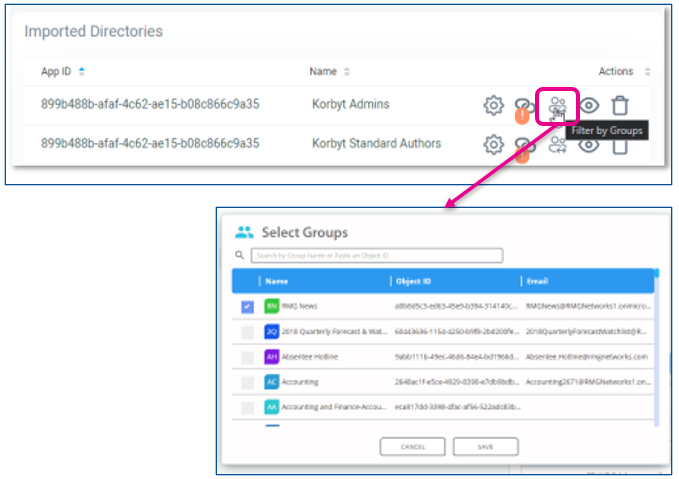
In Korbyt – Filter By Group
If specified, the import process will only add users that are members of selected groups. This can be helpful if you have a large number of users and you only wan to import a subset of those uses
In the Azure Menu, use the Action to select Filter By Group
Now established, Azure AD and Korbyt will communicate periodically to match the users that should be in Korbyt based on the information in your Azure AD.
Employee Login: Once the import is processed and complete, an employee will be able
to log in to Korbyt Anywhere using their Azure credentials
Import End Users Through Azure
End Users are those who only log into the Desktop or Mobile&Web platforms, and do not access the Korbyt Tenant to adjust settings.
If someone is both a CMS and End User they will need to be imported through both setups
Importing Users: Inside Korbyt Anywhere, setting the information so that Korbyt can automatically create a corresponding CMS
and/or Desktop or Mobile user for each employee it detects in the customer’s designated Azure groupsIn Korbyt – Enter User Import Parameters
Open the Mega Menu, in the Advanced section, select Azure AD
Click the pink +Add New Azure Users button and enter the details you established in the first steps
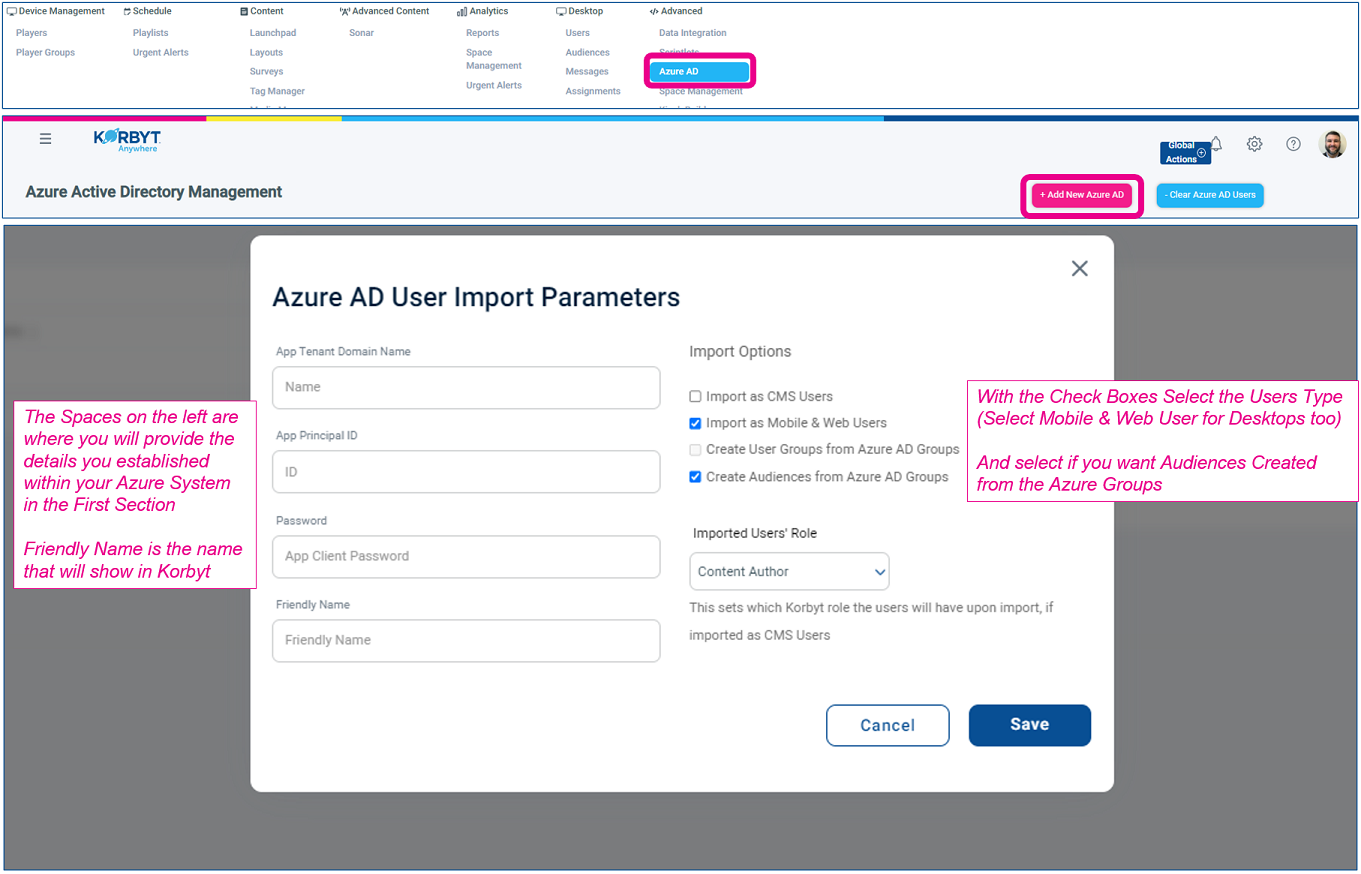
Click Save
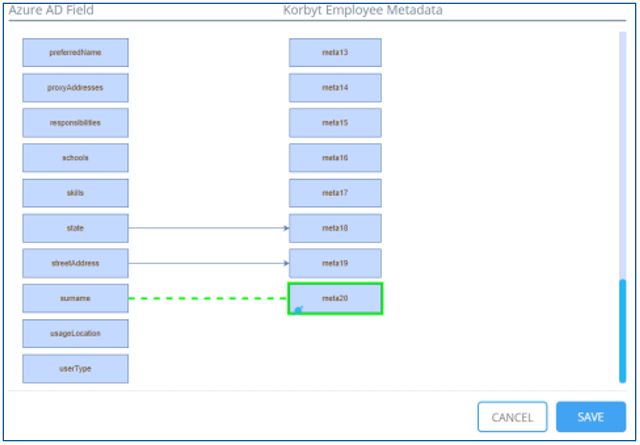
In Korbyt – Map Azure Fields to Employee Metadata
This will allow you to select the Azure AD Fields you would like to make part of the employee record in Korbyt
In Korbyt – Filter By Group
If specified, the import process will only add users who are members of selected groups. This can be helpful if you have a large number of users and you only wan to import a subset of those uses
In the Azure Menu, use the Action to select Filter By Group
Now established, the Azure AD and Korbyt will communicate periodically to match the users that should be in Korbyt based on the information in your Azure AD.
Employee Login: Once the import is processed and complete, an employee will be able
to log in to the Korbyt Mobile or Desktop applications using their Azure credentials
SAML 2.0 Integration to Manage CMS Users
IdP vs SP
Korbyt supports SAML 2.0 Identity Provider (IdP) initiated SSO.
This is where the user logs in to the IdP, so is validated as part of that login, and all SSO is then handled by the IdP
Korbyt also supports SAML 2.0 Service Provider (SP) initiated SSO.
This is where the user logs in by navigating to their specific login URL to fire the SSO event to the customer's identity provider.
The URL will be formatted as https://delivery.korbyt.com/saml2/login, for example
Configuring Kobryt for SAML 2.0 SSO
Korbyt expects the following values from the IDP:
This integration is ultimately facilitated by an exchange of metadata between Korbyt and your IDP.
The Korbyt SAML2 metadata file that you provide to your identity management provider can be configured in the format below. The server FQDN will be unique to your server/tenant.
http(s)://<server FQDN>/saml2/metadata
For example, https://<your Korbyt subdomain>.korbyt.com/saml2/metadata
The example below is taken from a Korbyt demo hybrid tenant
The example below is taken from a Korbyt demo hybrid tenant

The output of the browser call is the XML file itself in readable form. You are interested in three entries, as well as an optional entry –
“entityID” – in this example = https://delivery.korbyt.com/saml2/metadata
“Assertion consumer service URL” = https://delivery.korbyt.com/saml2/acs
The ACS “index” = 1
Single Logout Service (optional) = https://delivery.korbyt.com/saml2/sls
If manually entering these values, click the edit “pencil” next to Basic SAML Configuration and enter the values as seen in the XML file on the browser window.
If uploading the XML file, save it from the browser session by right-clicking anywhere within the main browser window, selecting the “save as” option, and then saving the subsequent XML file into a suitable location.

Provide your IDP Metadata URL to your Korbyt representative to configure your tenant for SAML SSO.
Note: Making the metadata available via URL is preferable if the values/certificates are going to be rotated or changed often.
Note: If the IdP is MSFT Azure, the correct url to provide is the Metadata Federation XML URL but make sure that it is the full URL with the APP ID query string on it
IDP needs to provide the following values in the SAML2 assertion –
FirstName
LastName
Email
Role
Groups (optional)
Tenant (optional)
We need to provide these values using the exact wording for each value as shown above, ie we need an assertion value named “FirstName” and one named “Email”, so we must ensure that the assertion info coming from your IDP is named in the format used by Korbyt.
The syntax of these 5 values can be upper or lower case, but must be exactly the characters given above (ie no spaces). The internal SSO code of the server is able to handle either uppercase, lowercase or a mixture of the two, but the actual characters used must match those shown above. The code snippet below also shows the syntax as used for these 5 values.
Now that you have your SAML claims set with the correct name for Korbyt SSO, you need to ensure the correct values for those claims are being provided by your IDP
Role Claim
For the Role claim, there are 6 roles available on Korbyt, and the value that must be placed in the claim to match these roles is shown in the table below. For a breakdown of the roles and their abilities, see Content Managers (CMS Users) Roles And Abilities
Note: that these values must be entered exactly as shown in the table below.
If you do not provide a “Role” claim, or enter an invalid value compared to the table above, the user will be given the role of Content Author by default.
Groups Claim
For the Groups claim, the value sent in the “claim” must exactly match any existing User Groups that are already created on the Korbyt platform. For more info on creating user groups, see the above section of this article, To Manage CMS User Groups
New groups cannot be created via SSO. If the value in the Groups claim does not match exactly an existing User group, or has a non-existing group value, the default is to not set the “on the fly” created using into a group, so they have no group membership, unless an exact match is made. Multiple groups can be sent in the claim, with each group name being separated from the others using a comma.
An example of a completed claim is below, where static values have been entered in the Role and Groups claim, where usually these would be dynamically provided via your IDP.

Once you have your attributes and claims set up, you should be ready to generate your metadata URL from your provider and enter it into your Korbyt tenant.
This document does not go into generating the metadata url so please consult your provider documentation or administrator for help with that process.
Set up Your IdP Metadata URL in Korbyt CMS
Through the Mega Menu or the Sidebar Navigation, open the Advanced section and click on Directories
Click the IDP button
Then toggle on Enable SSO for CMS
Enter the metadata URL provided by your identity provider

Korbyt will automatically query the metadata URL and fill in the Entity ID, SSO URL, and Certificate Data fields
Click Save
You should now have the correct information set in Korbyt and being entered into the SAML2 claim that will invoke the SSO on the Korbyt server when the user clicks on the “Korbyt” app from their app tray or visits the login URL.