BrightSign General Information Via Related Links
Written By Ed Kinne
Last updated 7 months ago
This article compiles all the available links and articles to make it easy for the customer when searching for relevant information about the BrightSign players connected to Korbyt
This Article has several sections
Use the On This page menu to the right to jump to a specific section
********************
First Step by Step BrightSign Configuration articles
In these three steps, we will assist in getting the BrightSign configured within the BSN.Cloud and Korbyt CMS
Step 1. Whitelist BrightSign and Korbyt on Your Network
BrightSign Requirements: BSN Ports and URLS for Players and Software
KORBYT: Korbyt Player Network Connections
Step 2: BSN.CLOUD,
BrightSign’s Cloudbased Administrative Portal for their devices
– Sign up for the account / BrightSign Configuration
Use the following link to sign the board if you haven’t already. If you don’t have an account, you will need to create a new one; it is free.
BSN.Cloud: https://control.bsn.cloud/Use the following link to for information on how to configure the BrightSign via the
Brightsign Configuration Instructions using BSN Cloud
Step 3: KORBYT CMS – Tenant
Provision the Player on Korbyt CMS – The information in this article describes step-by-step instructions on how to provision a player and how to perform bulk provisioning.
***************
How To Delete A BrightSign Player From BSN.Cloud Account
These Instructions will assist you in removing a BrightSign from a BSN.CLOUD account if it needs to be shifted to a Different BSN.Cloud account
When a player is provisioned on a BSN.Cloud account, but no longer needed, it would have to be deleted from that account. By deleting the player, it allows the player to be registered under a different account.
Steps below will walk the user on how to delete the player from the BSN.CLOUD.
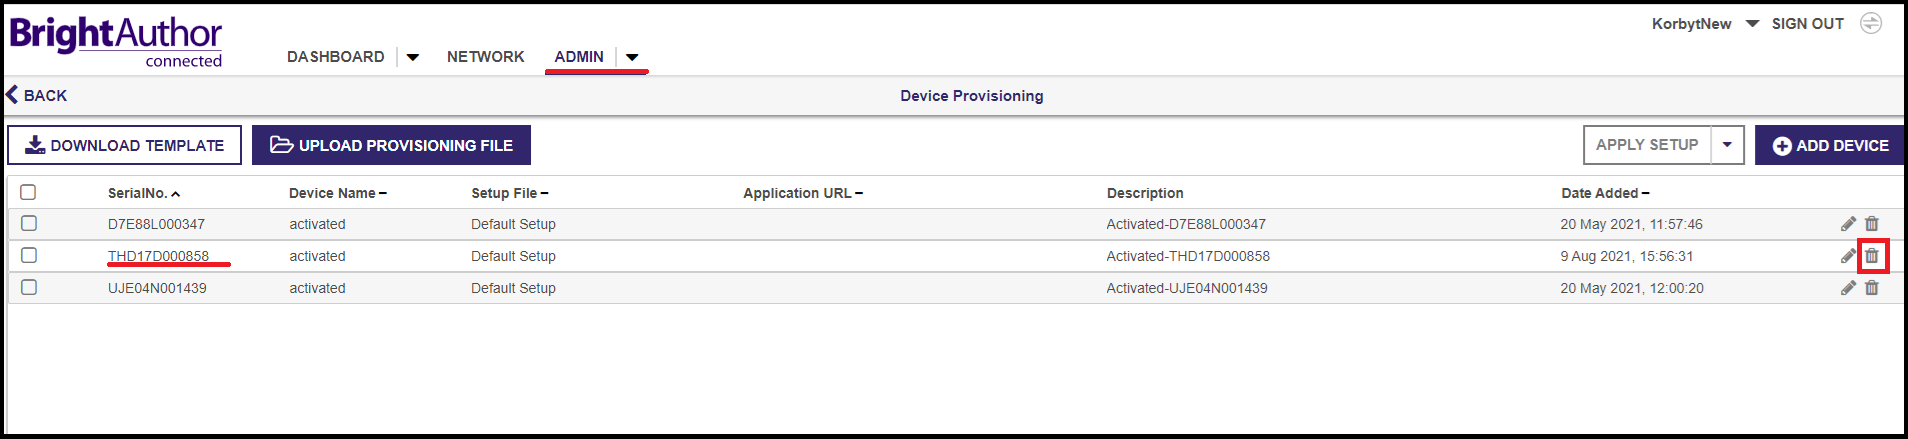
Log in to the BSN.Cloud using your credentials
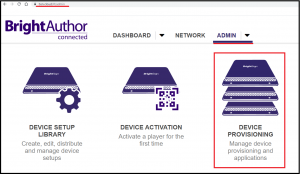
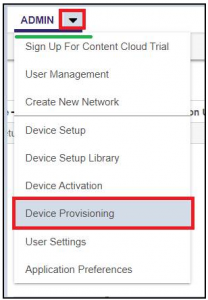
Navigate to the ADMIN tab

Click on the Device Provisioning option
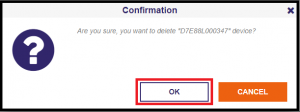
Select the desired player and click on the delete button.
A confirmation message will appear. Click OK to proceed. OR click on the CANCEL to abort the action.
***************
How can we confirm if a BrightSign is able to connect to Korbyt?
These Instructions will assist you in identifying if the BrightSign is able to connect to Korbyt CMS.
Log in to the BrightSign configuration page using the default login of “admin” and password of “The Serial number located on the bottom of your BrightSign player” unless you have changed those login credentials.
Click on the diagnostics tab and enter https://www.korbyt.com/ws/healthcheck as the Download Speed Test url:
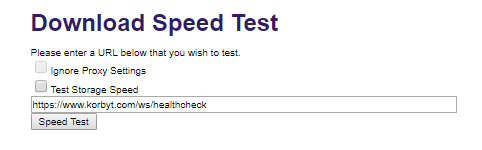
If you get a response similar to “Downloaded 19.000 Bytes in 0 seconds (226 milliseconds) – 83.819 B/s” then the player is communicating with Korbyt.
If you get an error, then you have a network issue preventing communication between the player and Korbyt.
An additional URL to test against is https://www.korbyt.com/prt/v11/img/default_image_1.jpg
Lastly, if go to the log tab and select download log, you can provide that log to RMG Korbyt Support or review it yourself for additional information.
***************
How to factory reset a BrightSign Player
In this section, we will go over two methods for factory resetting your BrightSign device and how to identify which method you should use. First, to identify what kind of BrightSign you have.
Do you have an SSD BrightSign or an SD BrightSign?
This can be troublesome at first glance. Both the SD and SSD models are identical. No worries, we have provided the information you need to get started on your factory reset below.
Step 1. Delete the player from Korbyt (if needed)
Step2. From a browser, navigate to http://ipaddressdisplayed. If you see a login prompt, the username is admin, and the password is the serial number of your device.
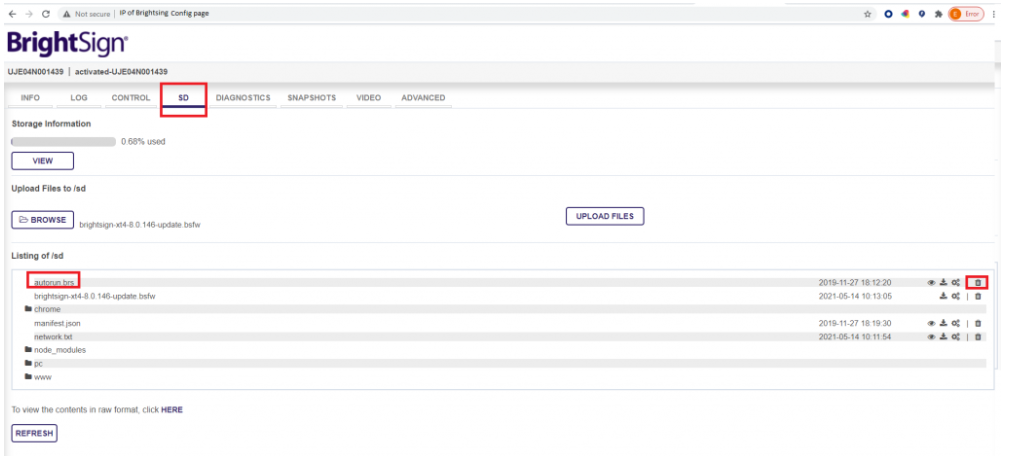
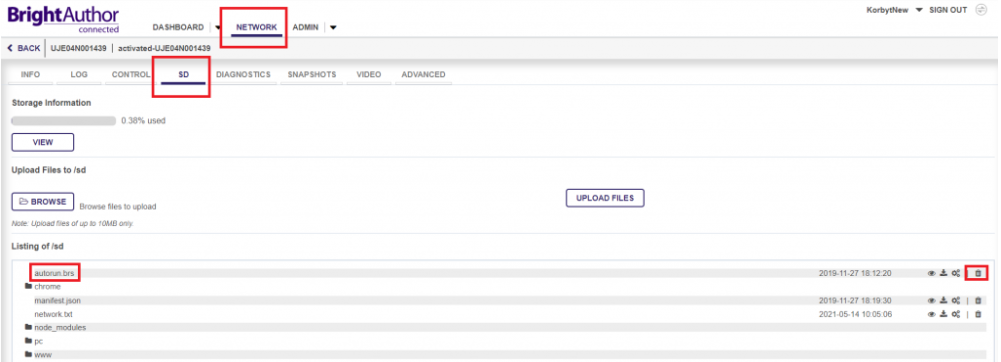
Step3. Observe the tabs at the top when you sign in. You will see an SD tab or an SSD tab. Within the tab, delete the autorun.brs file. If listed under the Listing of/SD section. Otherwise the brs file might need to be deleted from the BSN.Cloud.
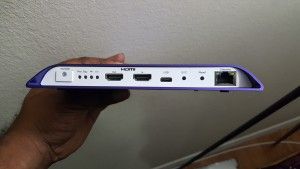
The best way to determine if you have an SSD (Solid State Drive) player or an SD (Secure Digital) storage device is to inspect
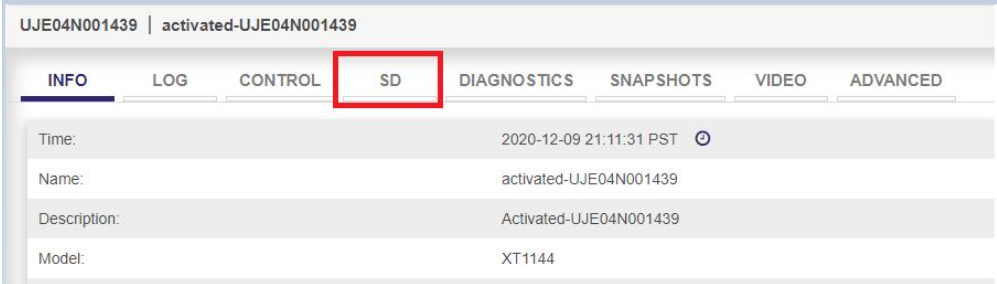
Example from BrightSign player config page
Example from BSN Cloud with the specific player
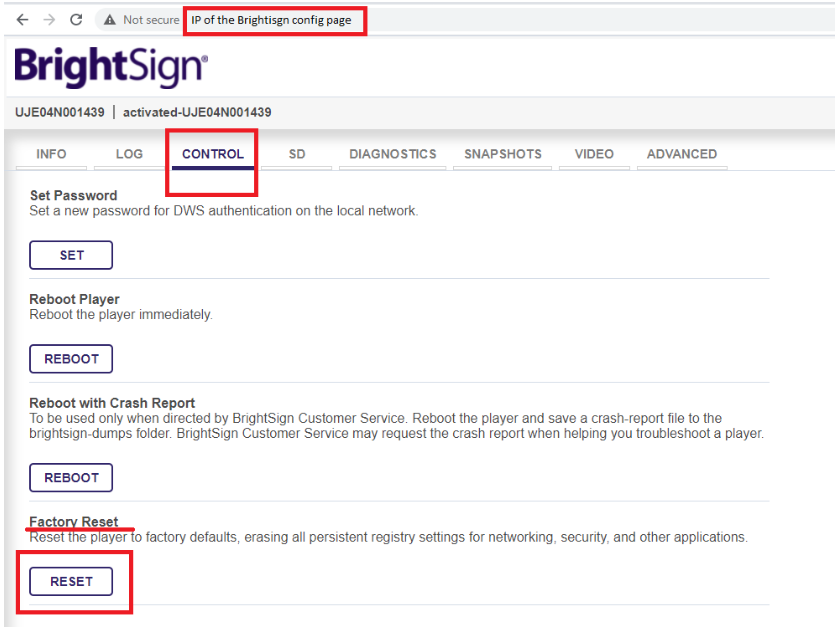
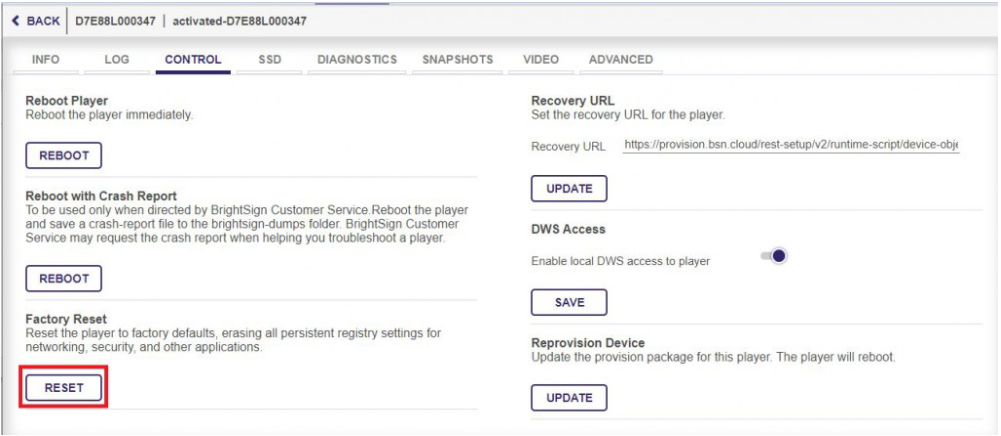
Step4. Select the Factory Reset.
BrightSign Player (1144XT SSD ONLY)
You will notice that your BrightSign has two buttons on the back. The SVC and Reset buttons. To factory reset your device, follow the following steps.
Step 1. Shut down your device and disconnect it from its power supply (or both the Ethernet connection and power if you are using Power over Ethernet).
Step 2. Hold down both the SVC and Reset Buttons at the same time.
Step 3. Continue to hold down the two buttons while powering on the device. You will notice the Err light flashing red. Once you see this, you can release the two buttons. Your player will reboot, and the factory reset has been completed.
*If this method does not work for your SSD BrightSign, you can try the second method below.
BrightSign Player (1144XT SSD and SD)
Step 1. From a browser, navigate to http://ipaddressdisplayed.
Step 3. You will then see a login prompt; the username is admin, and the password is the serial number of your device.
Step 4. Select the SD or SSD tab on your device.
Step 5. Delete the autorun. The .brs file is listed on your storage device.

Step 6. Navigate to the control tab on your device.
Step 7. Select the reset option on your device. The device will reboot multiple times before completion.
Once the player has been factory reset and internet access has been re-established, you will be provided with the player’s provisioning token for the BSN cloud. We encourage you to create a BSN account. Once this has been completed, please follow the instructions HERE to set up your BSN account to ensure the player downloads the Korbyt software once it is provisioned. Please ensure the configuration of your BSN account is complete BEFORE provisioning. This will ensure that the Korbyt software is downloaded as soon as it is provisioned to the BSN cloud.
If your player already belongs to your BSN cloud that has been configured, your player will automatically download the Korbyt software once the reset has completed.
****************
How to downgrade or upgrade BrightSign players’ firmware
Introduction. In this article, we will go over how to downgrade or upgrade a BrightSign player's firmware. It will also describe the steps on how to tell what version the player is currently on
How To Downgrade Or Upgrade Your Brightsign Players Firmware
***************
How to set up LiveTV on a Brightsign Player
If your BrightSign Player has an HDMI input it is possible to display that live incoming HDMI feed through a Korbyt Layout
You will need to create a Layout
Use the Video Element for the Live TV feed
***************
How to set up the Time Zone on a BrightSign player via the BSN.Cloud
The Time Zone information is critical for real-time adjustments of content or displaying the Time on a Layout
The Steps below will walk the user on how to set/change the time zone using the BSN.Cloud and via Korbyt CMS. Login to the BSN.CLOUD, an account is needed (sign up for one, is free). If you don’t have one…
Login to the BSN.CLOUD, an account is needed (Signup is free). If you don’t have one you should be able to create one.
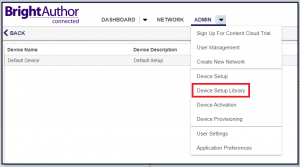
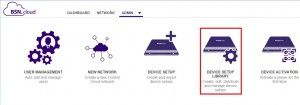
From the Admin Tab go do the Device Setup Library:
Edit the setup being used by the device, which could be the “default device”:

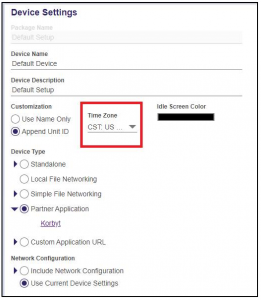
Verify or Change the time zone, to the desired one
Click on the Update Setup File in Library

Click on the Admin dropdown to go to Device Provisioning
Select the Device and Click the Apply Setup Button
Select the Device Setup you edited
Click on the Apply Setup button
Click on the Network tab

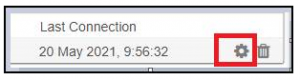
Access the Player Support Page by clicking on the Setting Cog on the Device listing
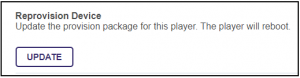
Go To the Control Tab

Click on the Update button in the Reprovision Device
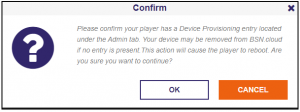
Click OK to confirm the reprovisioning and wait for the device to reboot
To complete setting up the TimeZone, connect to the Korbyt tenant
Select the BrightSign player and click on Edit
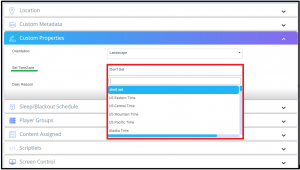
Under the Customer Properties select the “Set TimeZone”
Click on the drop-down and select the desired time zone
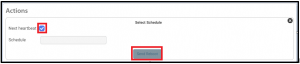
Under Actions click on the Reboot button to reboot the player
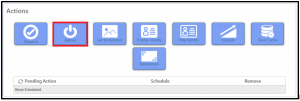
Check the Option for “Next Hearbeat and click on Send Reboot button.
***************
How to set up a BrightSign WiFi module
For WiFi, the BrightSign player must have a WiFi module and antenna installed. If a WiFi module is not installed, the WiFi network option will be greyed out during the network setup.
For WiFi, the Brightsign player must have a wifi module and antenna installed.
If a WiFi module is not installed, the WiFi network option will be greyed out during the network setup.
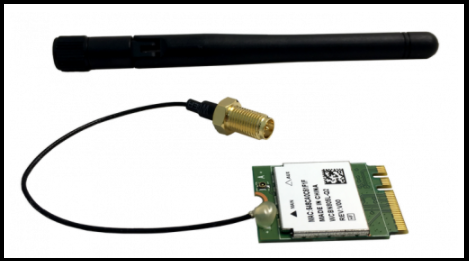
Contact Brightsign to purchase a wifi module – support@brightsign.zendesk.com or phone 1-408-852-9263.
Brightsign wireless module installation tutorial — https://www.youtube.com/watch?v=_cK3RskJxBQ
***************
How to statically assign IP addresses for BrightSigns
Within this Section, you will be provided information on how to change the network settings on a BrightSign from DHCP to a static IP address
Introduction
Within this article, you will be provided information on how to change the network settings on a Brightsign from DHCP to a static IP address. This process is useful if your IT requires that the players are placed on a specific network that doesn’t have DHCP configured.
BSN Management
Once your player has been provisioned to the BSN management console at control.bsn.cloud, you will then be able to change the network options of each device. New devices that have been provisioned to the BSN management console for the first time will always be pushed the default device setup. This default setup can be reviewed by selecting Device Setup Library under the Admin tab.
Players that are connecting to the BSN for the first time are configured with DHCP settings by default to make the initial connection to the BSN cloud.
You can change the default setup using the information below, but you will have to keep in mind that all devices connecting to the BSN for the first time will revert to the IP address you specify. If you are configuring multiple players at the same time, this could cause an IP conflict within your network, making the players difficult to manage. This method is not advised.

Configuring Static IP
Once a device has been connected to the BSN for the first time, you can now create a new device setup. Once a new device setup has been created, it will be moved to the Device Setup Library. There are two ways to get to this option. The first option is by selecting Device Setup under the Admin tab.

The second, is to navigate to the Device Setup Library and then select the New Device Setup option in the upper right-hand corner of the page.

Once you have selected one of these options, you will be given the following screens to configure your new device setup.
Fill in the Package Name, Device Name, and Device Description.
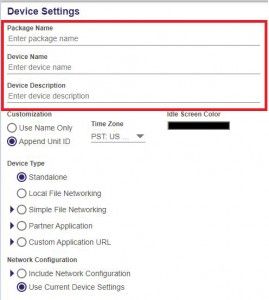
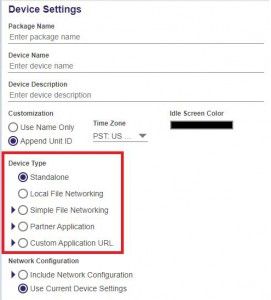
Then for device type select Partner Application.
Once selected, you will be provided a dropdown option for the partner application, select Korbyt. This will ensure the player using this setup will download the Korbyt software for use.

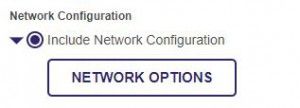
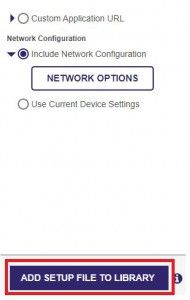
For your network Configuration, select the Include Network Configuration option. You will then see the Network Options button, select it.
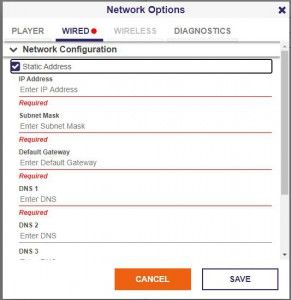
Once selected you will see the networking options prompt. Select the Wired tab, from here you will be able to configure a static IP for this device setup.
Once completed, select Add Setup File To Library Button at the bottom of the page.
Assign new device setup to a player
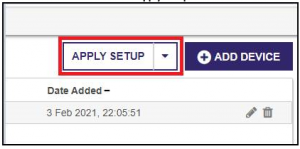
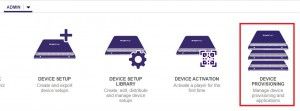
Now that your new setup has been made and added to the library you can now have this assigned to your player. First navigate back to the Admin page of your management console. This time you will want to select the Device Provisioning option. This will provide you with a list of all of your provisioned devices.
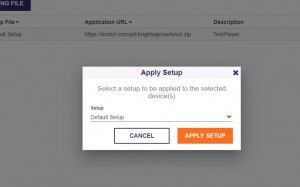
Under the device provisioning page you will see your provisioned players listed. Within your player list ensure that ONLY the player in question has a check box by it as shown below.

You will then select the Apply Setup option on the upper right-hand side of the screen.

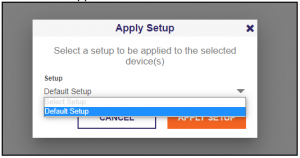
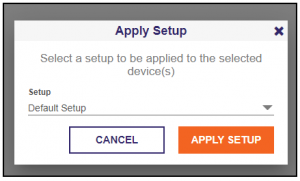
Once selected you will be given a prompt to select a device setup from a drop down menu. This menu will have the device setup you created earlier, select it and then hit Apply Setup.
After a few minutes, your player will reboot and apply the new setup configuration with the new static IP!
***************
Support on SSD and/or SD Card installations on BrightSign
Does the Korbyt platform support SSD and/or SD Card installations on BrightSign?
Yes, Korbyt will install on both BrightSign units with SSD or SD Cards. We do recommend SSD for best performance.
***************
BrightSign models supported by the Korbyt platform?
What BrightSign models are supported with the Korbyt platform?
All models of BrightSign are supported on the Korbyt platform. NOTE: Content playback performance may differ on each model. Also not all features may be available on all models.
Korbyt Digital Signage Media Player Feature Comparison
***************
BSN Brightsign Configuration Instructions
In this article we provide instructions on how to configure a BrightSign player