How To Manage CMS Users And User Groups
Written By Ed Kinne
Last updated About 1 month ago
This article describes the steps to add and Manage Individual CMS Users and CMS User Groups (Users who can log into the Content Management System directly).
Users are Individuals who can log into the CMS and manage content directly
For more inforomation on the available user roles see Content Managers (CMS Users) Roles And Permissions
User Groups are used with Folder Permissions and Player Group Permissions to control or limit which users can see certain content and Players
To manage other users, you need to be a Tenant Administrator or Administrator
Accessing and Viewing CMS Users
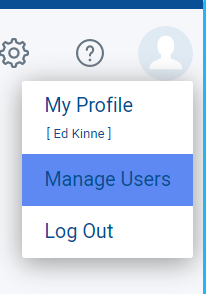
Login to your tenant
Hover your mouse over the User Profile Outline (or your Profile Picture) in the Upper Right Corner

From the menu that appears, select “Manage Users”.
On the Manage Users window, there are two buttons, “Add User” or “Manage User Groups” or you can search for an existing user.

Add User = Create a New CMS User
Search = Find an existing CSM User
Manage User Groups = A different screen for CMS User Groups (used to control access)
Adding a New User
Click on the “Add User” button to add a new user.
The Add New User window will appear. On this window, the user information has to be entered and the permissions for Signage, Mobile & Web, and Desktop can be selected.
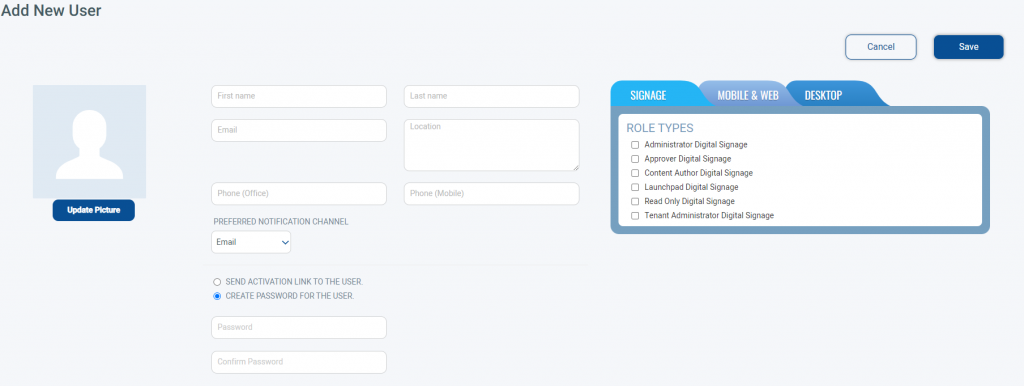
Enter the CMS Users information (First Name, Last Name, and Email are required)
Select the User’s Role Type.
This determines what role and permissions the new user will have within the tenant.

For more information on roles see Content Managers (CMS Users) Roles And Permissions
Choose between Send Activation Link to the User or Create Password for User
Send Activation Link to Users will generate an email to the user with a link for them to activation their account
The link does expire after two days if not used
Create Password for the User allows you to set an initial password that you can then alert the user to
Click Save
The CMS User is now created
To Manage an Existing CMS User
Find the user in the list of current CMS users (you can use the search to find them)
Once found, you can view information about the user (Name, Email, Roles, User Groups, Last Login, Last Update)

Clicking the Pencil Icon will allow you to edit the User’s information and role,
Clicking the Trashcan will delete
After clicking the Pencil, you can edit the Name, Contact Information, and Role
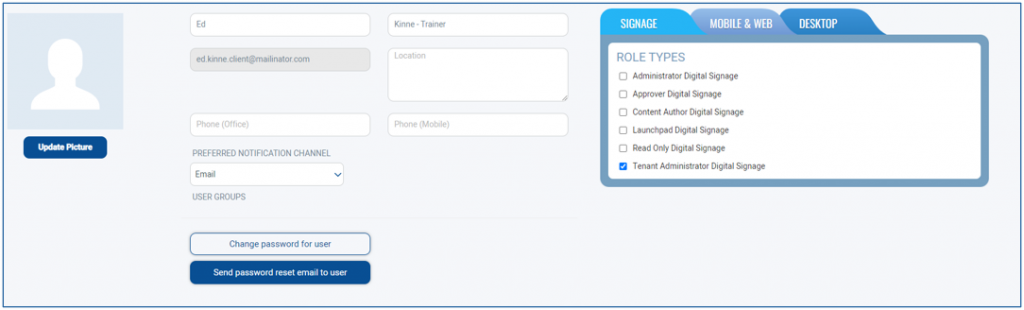
You can also change the user’s password, or send the password reset email to the user
If they were sent an activation link, but did not use it in time, you will have an option to Resend the Activation Link
To Manage CMS User Groups
User Groups are used in the CMS to control who will be able to access to Folders, and Player Groups based on group membership.
An example use might be limiting a group of of Content Authors for a specific location to only be able to access Layouts that are within a specific folder for that location. These steps describe how to create and edit group memberships.
The Korbyt System automaticly creates groups based on assigned user role
You do not need to create a group for “Authors” as Korbyt will create and manage the group automaticly
To Create a Custom User Groups
Login to your tenant
Hover your mouse over the User Profile Outline (or your Profile Picture) in the Upper Right Corner
From the menu that appears, select “Manage Users”.
On the Manage Users window, click Manage User Groups
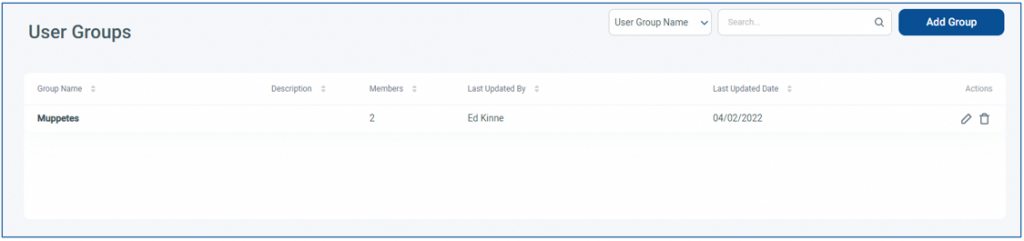
Click on the “Add Group” button to add a new group. This will open a window to name the Group, provide an optional Description, and select Group Members
To edit an Existing Group, click the Pencil next to it
This will let you edit the group details (Name, Description) and Add or Remove members
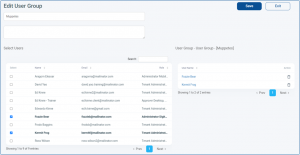
To add a New Member, check their name on the left
To remove a member, click the trash can next to the name on the right
When done, click Save
Group Permissions to Control Access
With User groups in place, you can use them to control access to specific Folders and Players
For Folders, it is controlled by clicking the padlock symbol for the folder you wish to restrict

For Players it is done through Player Group Access permissions
Single Sign-On Management
Single sign-on (SSO) for Korbyt CMS enables customers to use their existing corporate user/password details when logging in to the Korbyt CMS. It avoids the need to keep the password details updated on the CMS, as well as simplifying connection to the CMS for users already logged in to their corporate network.
Korbyt supports both Azure AD and SAML 2.0
To review the steps to set up SSO please see SSO (Single Sign-On) Options in Korbyt